Blog Posting Guidelines for Repurposing Long-Form Videos
Repurposing long-form video content into engaging articles is a great way to maximize your reach and improve SEO.
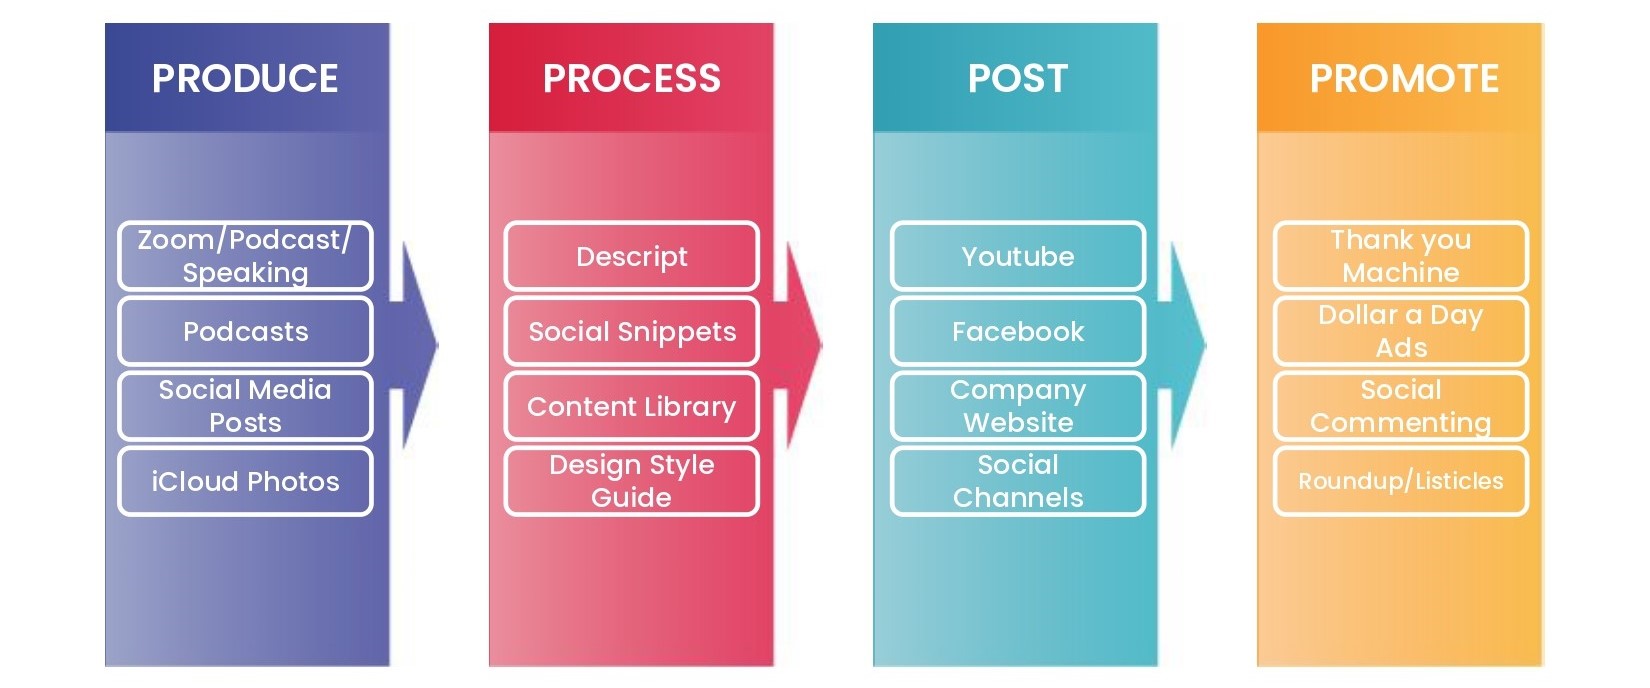
Repurposing content is a part of the 'Process' stage in the Content Factory.
Here's a guide to help you get started:
Task Checklist
Before You Start Writing
1. Upload the video to Google Drive
2. Watch the video
3. Transcribe the video
Writing and Editing Phase
4. Edit the transcript
5. Add title and headings
6. Include images
7. Insert relevant links
8. Add source context (video, post, brief)
9. Proofread and QA your work
After You Finish Writing
10. Publish on WordPress
11. Categorize and keyword-tag
12. Apply SEO Plugins (RankMath and LinkWhisper)
Additional Steps
13. Determine article length
14. Choose where to publish
15. What to do when writing for offsite publications
16. Email and DM the client
17. Post in the 43K group
Execution Process
1. Upload the Video to Google Drive
After creating the task on BaseCamp or a similar project management tool, upload the video to the designated folder and sub-folder on our Google Drive, as outlined in the guide for this task.
2. Watch the Video
Before you transcribe a video, it's really important to watch the video first. Here's why: watching helps you understand what's happening, where to put pauses and emphasis, who is talking, if the sound is good, what the words mean, how to fill in missing parts, get what the speaker wants to say, check if the content is okay, and match up the words with the video timing.
In short, watching ensures you get the GCT (goals, content, targeting) right, vital for an accurate and meaningful transcription.
3. Transcribe the Video
Use Descript for a smooth transcription. It’s a top choice for audio and video editing with excellent transcription features. Check our guide on transcribing pillar content with Descript.
Keep in mind, Descript's auto-transcription is mostly accurate but may falter in tough audio scenarios. Always review and refine your transcription to ensure top quality.
4. Edit the Transcript
This is one of the most important steps in repurposing because the quality of your repurposed article depends a lot on how well you edit the transcript.
ChatGPT can help refine your transcript by suggesting changes, fixing errors, and offering word alternatives. Here’s how to use it:
- Prepare the transcript, whether it's from automated software like Descript or created manually. This includes removing filler words, ensuring each dialogue is assigned to the correct speaker, and going through the transcript, breaking it down into logical chunks based on the topic being discussed.
- Start a conversation with ChatGPT by including the transcript in your input. Instead of giving the entire transcript at once, it's better to work with one part at a time, which you identified while preparing it. This makes it easier to identify and fix errors as you go.
Clearly tell ChatGPT that you're seeking editing help. Also provide context, for example, you can specify if you need the transcript to be more concise, maintain a particular tone or follow a specific style guide. - If there are missing words or errors in transcript, ChatGPT can help fix them. For example, enter the prompt "Can you suggest corrections or improvements for this transcript?"
- Iterate if necessary: For longer transcripts, you may need several rounds of interaction with ChatGPT to refine the text and achieve the desired level of accuracy. If any suggestion is unclear, ask ChatGPT for more information or examples.
- Review the entire edited transcript for accuracy, consistency and coherence before finalizing.
- Further polishing: Highlight your content's key elements. Use bold for standout statements, italicize “quotes from others,” and use headlines for structure. Summarize main points at the end for impact.
Although ChatGPT offers great editing help, it isn't infallible. Trust your expertise to make final decisions, ensuring the transcript fits your needs.
Be cautious with sensitive information. ChatGPT remembers past interactions, so it's wise to exclude confidential details from your editing requests.
5. Give the Article a Snappy Title and Headings
Pick an appropriate title that would rank well. Then, organize with impactful headings. You can use ChatGPT for title ideas, ensuring they match the Goals, Content, Targeting (GCT).
An example of a great heading is Logan Young’s “I Have 602 Sales Reps Making Just Over $1 a Day.” This title highlights stats and their impact - it also shows how the article can benefit the readers.
In the body, stick to H2s and H3s for headings in WordPress. H2s are subheadings for H1s - which is typically the main title; and H3s are subheadings for H2s.
The headings should always:
- Be brief and grab attention, as readers often skim.
- Motivate readers to read on.
- Sum up the following section's main idea.
- Contain a main keyword.
- Be used sparingly to avoid clutter. Check for heading abuse (that’s common with AI-generated articles)
Adjust the number of headings based on top search results, using tools like Surfer or Frase for SEO advantage.
6. Include Interesting Pictures
Take screenshots that show what you’re trying to convey. Placing a colored box around important numbers is the best way to draw a reader’s attention.
- Green for positive things, e.g. what something should look like, or what the reader should add.
- Red for negative things, e.g. what something should not look like, or what the reader should delete.

Important note on uploading images: When uploading images, always add them to the site's media library via the upload tool (look for the plus (+) icon).

Don’t paste directly from external sources like Google Docs to prevent display errors or broken links. This ensures your visuals stay clear and accessible.
DO NOT use stock images or ones lifted from Google Images.
7. Link to Thought-Provoking Content With Relevant Anchor Text
Anchor text highlights a clickable hyperlink. Collect useful articles during research to embed in your content, ensuring the links are relevant and descriptive.
When linking, make sure to avoid using the “Click Here” anchor text. Instead, use text that portrays what the link is about, like how Joshua Crouch of Relentless Digital Took $25,000 from Matt Howard of Travis and Sons Plumbing.
Avoid excessive self-promotion to prevent being seen as a spammer. While it's okay to have a URL in every paragraph or subtopic for emphasis, refrain from using affiliate links or overtly commercial content.
DO NOT use the same link twice in an article.
DO NOT include native links, instead use a relevant anchor text
DO NOT link to other sites unless it's an affiliate, partner, or client, since that bleeds link juice (which hurts our SEO).
We avoid linking to top-level domains unless they're for a client or one of our properties.
We DO want to include relevant article links throughout and at the end of our article. For instance, in a piece about cross-posting on Facebook, we'll hyperlink "cross-posting" to a blog post detailing various cross-posting methods (e.g., Twitter, Facebook pages, LinkedIn).
We'll also include links to related terms, maintaining a natural frequency seen in typical blogs.
Links should only be used for specific article pages or affiliate codes.
Each article should connect to broader, related topics. For instance, if discussing "Common Mistakes When Applying for a Job," it should link to a VA job application page and embed a relevant YouTube video.
8. Add the Source Context or Source Video
Make sure to embed the source context or video in the article to serve as a reference for readers and prevent any confusion regarding vague statements.
Also include a brief sentence providing context, like where it came from or the relevant situation. This helps readers understand the article's background and relevance, improving their overall reading experience.
9. Proofread and QA Your Article
Proofreading and editing your article is essential for refining and enhancing your content. Follow these steps:
| Editing Tips | Examples/Explanations |
|---|---|
| Scan for typos and capitalization errors | Use a spelling/grammar checker app like Grammarly for thorough proofreading. |
| Break paragraphs for better readability | Add spacing every 3-5 lines to improve readability. |
| Trim excessive adjectives and unnecessary phrases | Examples: "However," "On the other hand," "Meanwhile," "The fact that," and "Actually." |
| Use active voice instead of passive voice | Example: Active Voice: "I wrote the article." Passive Voice: "The article was written by me." |
| Avoid alliteration | While it can add emphasis, too much can sound forced and distract the reader. Example: "Peter Piper picked a peck of pickled peppers." |
| Avoid ending sentences with prepositions and linking words | Example: Instead of "Where are you at?" say "Where are you?" |
| Avoid weasel words | These vague terms or phrases lack clarity and can weaken your message. Examples: "Some people say that..." or "It is believed that..." |
| Avoid rhetorical questions | They kill engagement. Keep your writing direct and to the point. |
| Avoid exaggerations and messy comparisons | Example: Don’t say "This article is a billion times longer than necessary." |
| Ensure proper link usage | Check for low value, unrelated or broken links. Add appropriate anchor text to any naked links. |
For additional help,
Use tools such as ChatGPT or Grammarly for proofreading assistance. By entering a simple prompt in ChatGPT, such as "Fix grammar: ," and then inserting your article, you will receive a perfectly proofread article with all errors corrected.10. Post on WordPress
Creating a blog post on WordPress is simple - follow this task guide.
11. Categorize Your Post and Add Keywords
Before publishing on WordPress, categorize your article appropriately using its advanced category system. This keeps your content organized and easy to discover using the search feature.
Keywords (or “tags” as WordPress calls them) are special words you can reference in your article to help the search function find your post when someone is searching for a specific term.
You can include up to five relevant keywords or "tags" to describe your content. Doing this helps improve visibility and SEO. Using proper nouns from your article as tags is effective.
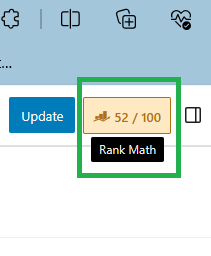
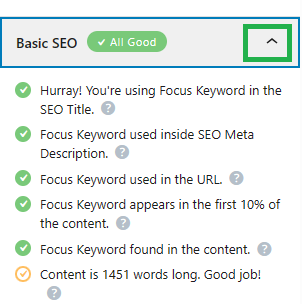
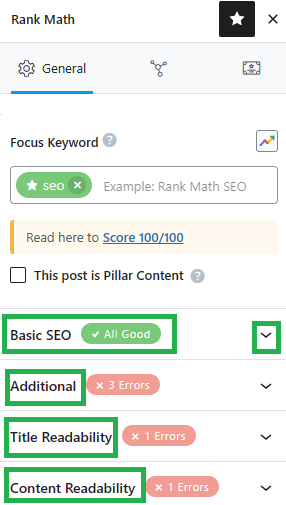
12. Apply SEO Plugins
a) RankMath is a very easy to use plugin that gives you actionable steps to quickly improve your on-page SEO.
The button is located at the top right on an article's edit page.
It breaks down improvement tips into four categories: Basic SEO, Additional, Title Readability, and Content Readability.
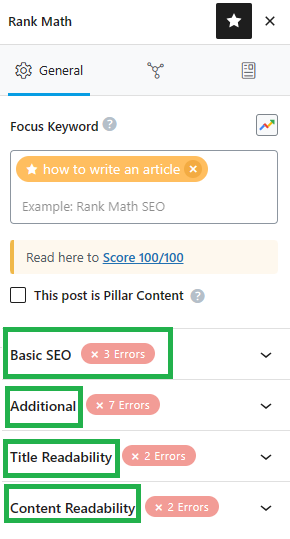
Click each dropdown to see where to improve.
Similarly, there is also a button to open a separate webpage to select 'Inbound' links from other posts or pages on the website. The method of selecting the links is similar to selecting the outbound links described above.
B) Use LinkWhisper Plugin to Add Links
When editing an article on our WordPress sites, you'll find the LinkWhisper plugin at the bottom of the page. It suggests relevant internal links, creating a cohesive network of related content. This enhances both SEO and user navigation.
Check the box to the left of the links you want to include and then click "insert links into post."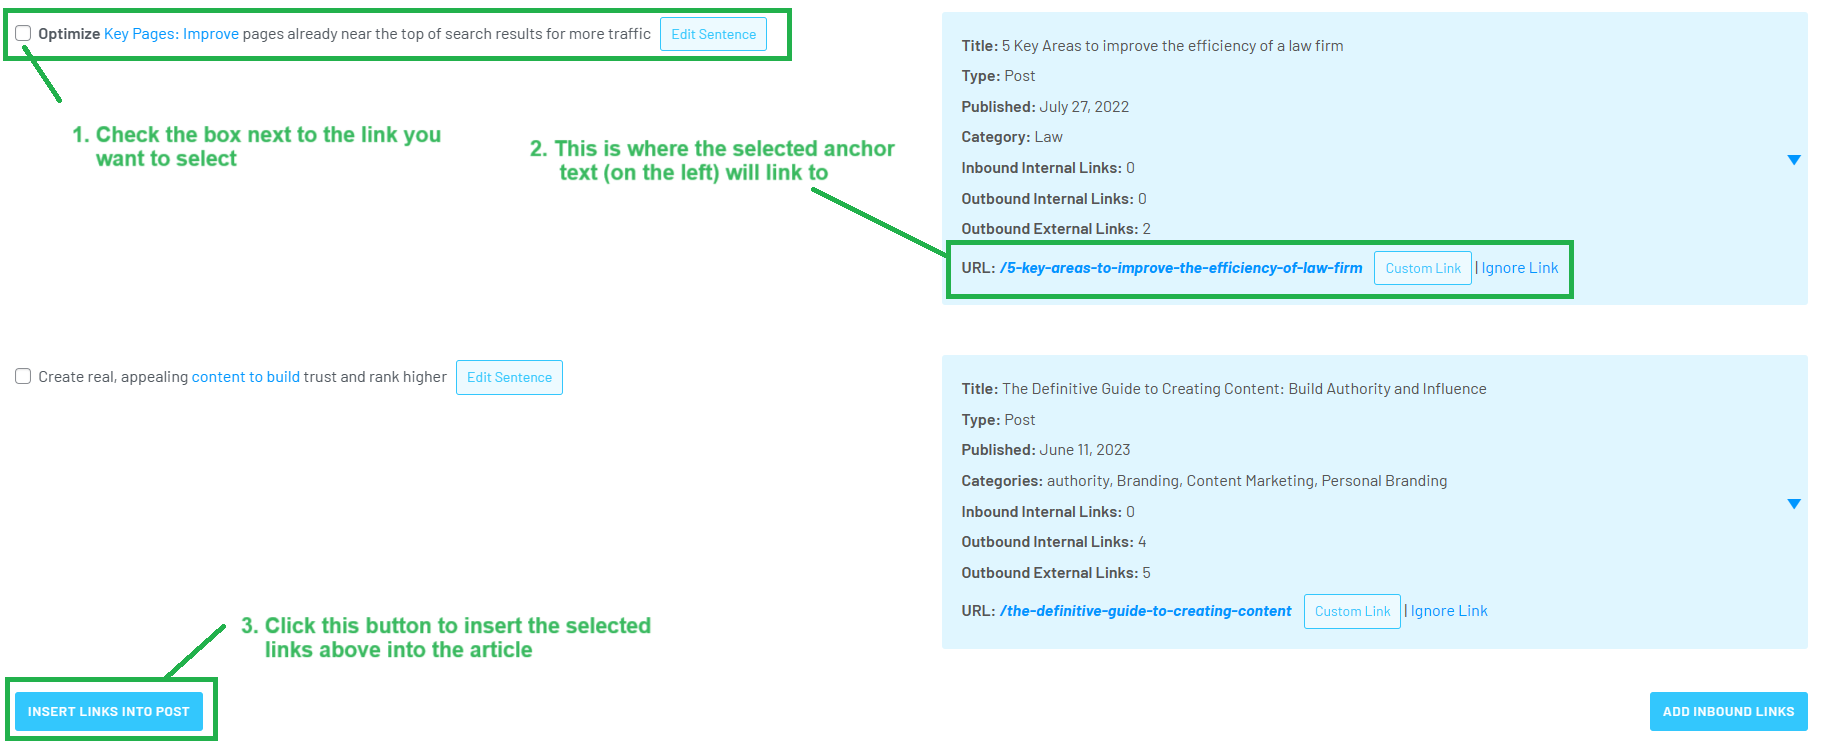
Additionally, there's a button that opens a separate page for choosing 'inbound' links from other website posts or pages, following a similar process.
13. How Long Should a Blog Be
A blog should be concise yet comprehensive—short enough to avoid fluff, long enough to cover the subject.
Length varies: small topics may need just 500 words; larger ones, up to 2,500 words.
Include timestamps and other key elements for a quality blog post.
14. Choose Where to Publish
- YourContentFactory.com: Publish any general digital marketing content and posts featuring Dennis's CoachYu interviews with successful entrepreneurs, where they discuss their expertise and journey.
- DennisYu.com: Post articles about growing up Asian, adapting to American opportunities, personal relationships, and personal insights.
- BlitzMetrics.com: Direct all general business content here.
15. What to Do When Writing for Offsite Publications
Examine the articles already published by the offsite publication you want to write for and understand the type of content they prefer. Pay attention to the structure of existing articles and review their article guidelines, including preferred word count and headings.
Then, analyze the client’s website and content that you plan to repurpose, determining how it can add value to the publication.
Develop an angle and topic that aligns with the publication’s content, focusing on maximizing value for its readers.
16. Email and DM the Client
After publishing an article that features a client’s business, it’s important to promptly inform them. Here’s how to do it efficiently and effectively:
How to Find the Client’s Contact Information
Look for it on Facebook, LinkedIn or Google by searching for the client’s name
Which Articles Should You Share?
- The article you just published and
- The article explaining how your article will help the client’s SEO: Hooray! Your SEO Improved With a DR62 Link From Us!
How to Compose Your Message
Write a clear and concise message to the client, celebrating their feature. Send this via email as well as Facebook messenger. Here is a message template that you can personalize:
Hi [Client's Name],
Great news! We've featured your business, [Website/Business/Company Name], on our DR62 website with a do-follow link.
To find out what this means for your website, read Hooray! Your SEO Improved With a DR62 Link From Us! - BlitzMetrics
Here is the link: [insert featured article link]
Looking forward to your feedback on the article.
Best,
[Your Name]
Content Team - Blitzmetrics
17. Post in Our Facebook Group
Write a brief, descriptive post to honor the client, with a link to the article you’ve just published, in our 43K Facebook group.
18. Key Points to Remember When Writing an Article
- Bold key statements.
- Italicize direct quotes.
- Keep it concise. Trim unnecessary details.
- Organize with headings for easy navigation.
- Split long paragraphs to improve readability.
- Recap major points at the end, using bullets.
- Start with data or metrics, providing the story behind them to add context. Then suggest actionable strategies for improvement.
- Conclude with an invitation for feedback, such as “What are your thoughts?” or “Have you experienced this?” There are many ways to initiate a discussion, so experiment with a few and share your experiences with us. (Yes, this is another example of starting a conversation)
If you enjoyed this tutorial, then check our Task Library, where you can learn how to get a thousand other things done.
Also understand the context and how this fits in with the Content Factory and Content Marketing.