How To Write an Article About Pillar Content
Crafting an engaging and high-quality article requires meeting certain requirements, and in this tutorial, you'll learn how to do just that. We'll cover how to transcribe speech from a recorded video, draft article topics, and structure your piece.
Important Note
Task Checklist
Information that you will need:
- The client's Goals, Content, and Targeting (#GCT).
- The RAW video file that serves as the pillar content.
Tools that you will need:
- Any text editor, such as Google Docs or MS Word.
- Any AI transcription software, such as Descript (access should be requested through the proper channels).
Steps:
- Transcribe the pillar content.
- Take timestamps and blog post ideas.
- Write the draft article using the transcription.
- Include interesting pictures and links to other articles to support the content.
- Proofread/use an editing service to tighten up your article.
- Link to thought-provoking content with relevant anchor text.
- Dress up your article with formatting and summarizing key points.
- Give your article a snappy title.
Estimated time it takes on average to post an article on your website about pillar content: A 60-minute recording would take 2.5 to 3 hours.
Before you begin...
This task involves creating an inventory of all the videos (content) a particular YouTube channel has. This means that you will be listing all the videos on the channel, which also includes YouTube Shorts. You will be sent a link to a Google Sheet, which contains the template that we are using. You should copy the tabs that are on that template and paste them onto a new Google Sheet. Save it under the name of the Client, so it will be easy to track.
The information that you are required to collect includes the Descript, Video Name, Date the video was posted, URL, Featured Speaker (if the client is being interviewed by someone or if the client is interviewing somebody), First Page, Video Ranking, Featured Speaker Twitter Account, Featured Speaker LinkedIn Account, Views, Video Length, BW Blog URL, Word Count, and File Name. Some of these items will be explained below.
Before you begin, it is important to prepare everything that you will need to get the job done. To start with, you should have the YouTube page and the Google Sheet loaded already in your browser before doing anything else. Starting the task in an organized manner sets you up for a successful completion of the task. We will use the “Home Service Expert” YouTube channel as an example (image below). Let’s begin.
Step 1: Transcribe the pillar content.
Most long-form content is not of high-enough authority to warrant using Descript and other tools. In other words, we can often post low-authority content (not by figureheads, not filmed professionally, not spoken clearly, with no clear proof, etc.) without transcription (just cutting off the ends and posting).
With Descript, we're on their enterprise plan (the highest one), which is necessary to use OverDub voices.
Descript's transcriptions are white glove ($2 a minute) and self-serve (7 cents per minute if we do the $20/month fee).
a. Confirm that nobody else has transcribed the video. To do this, check the Video Edit Queue Sheet and search for the file title you have.
-
- IF the file name is there, THEN check the “Transcription” column, and see if there is a link to a document. If there is, open the file, and see if the File is indeed correct.
- IF there are 0 results in the search box, proceed to further steps.
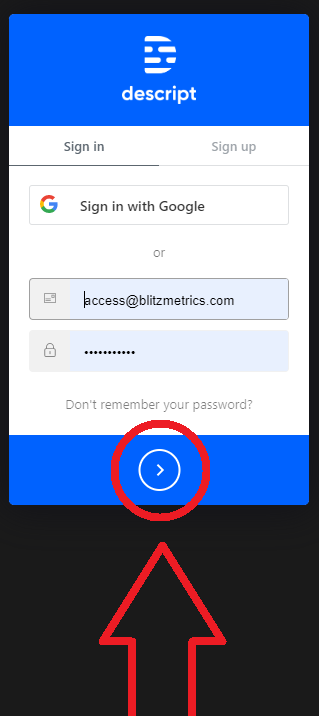
b. Access the transcription software by logging in using LastPass and clicking "Launch" on Descript.

c. The Descript application will then open in another tab with the Username and Password Filled out, and you just need to click the “Next” button.
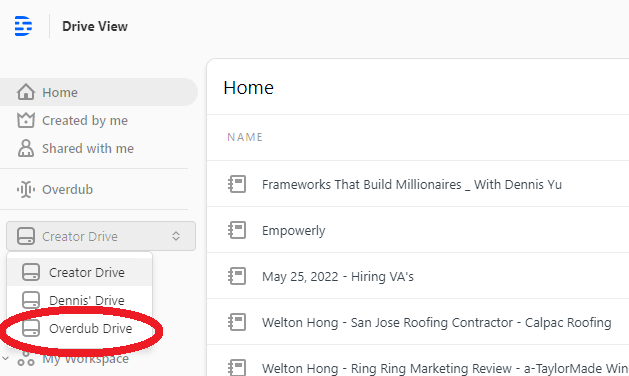
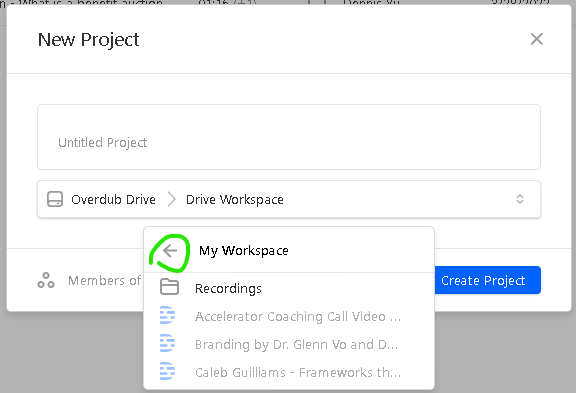
d. You'll be in the "Creator's Drive," but you need to access the "Overdub Drive." To do this, click on the "Creator's Drive," and a dropdown menu will appear. Select "Overdub Drive."

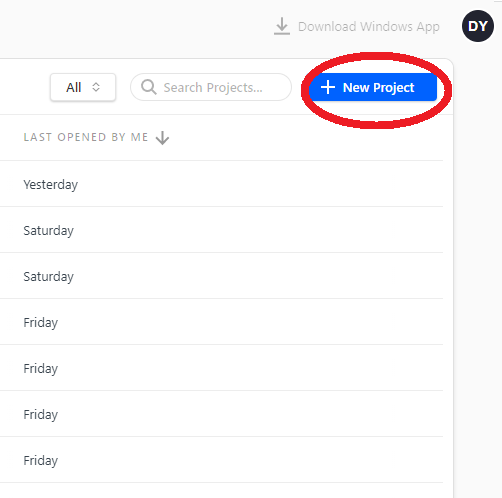
e. Click + New Project.
f. Name the file in the Untitled Project area. Make sure to choose Overdub Drive > Drive Workspace.
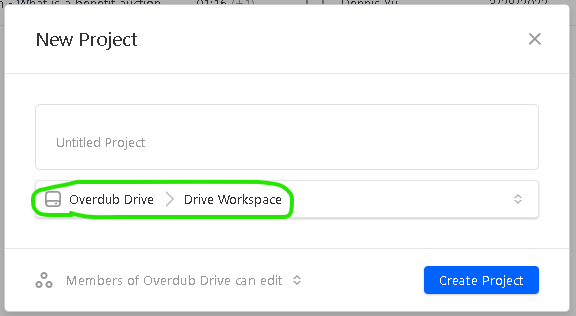
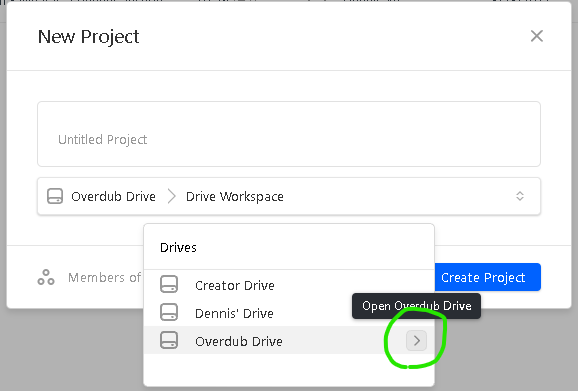
If you are not in the Overdub Drive or the Drive Workspace, you can navigate through the folders and drives by clicking the arrow icons.
|
IF |
THEN |
|
The file is for a client. |
Use the syntax client’s name- video title, (e.g. Conan O'brien - Caring For Your Pompadour, Aisa Jones - Dirt On Trial, Greg Perez - The Watcher). |
|
The file is for a course, program, or presentation. |
Use the syntax course/program/presentation name - video title, (e.g. Agency Management Program - 9 Triangles) |
|
The file is for a package |
Use the syntax package name - video title, (e.g. Content Engine Package - Plumbing) |
Click Create Project.
g. Import the RAW video by dragging the file from the source folder to the “Audio” icon in Descript. Descript will then process your transcript. Just click “Done” on the screen below and wait for the transcription to finish.
h. Review the transcript’s words that have blue underlines and correct them manually by right-clicking on each word, and selecting Correct.
i. When the transcription tool has corrected everything, you are then ready to save the transcription. Click on “File” then “Export.”
j. Choose “Text.”
k. Click “Export.”
l. Choose which folder you want the file saved, and click “Save.”
m. Once you have exported the file, save it to the relevant folder inside the Shared Drive.
Sample Result: TikTok Webinar with Perry Marshall
Step 2: Take timestamps and blog post ideas.
a. Watch the entire video and understand the meaning of the video while referencing the transcription to traverse through the keywords and topics with ease.
Answer the following questions to understand the meaning of the video:
i. What engaging title can I use?
ii. What is the central message of this piece of content?
iii. Who might end up seeing this content?
iv. How many completed videos will the editor make from this one RAW video?
v. Is there a way to emotionally engage the audience?
b. Prepare a comprehensive outline consisting of ten topics.
Each topic should last approximately 5 minutes, but this may vary depending on the nature of the discussion in the video. Each topic should encompass the most captivating, pertinent, up-to-date, or useful information.
For interviews, you can break down each topic based on each question.

c. Ensure that the content is evergreen.
Ensure that the content is devoid of references to particular events, dates, promotional sales, and so on. This approach will enable the article to remain relevant for a more extended period.
Step 3: Write the draft article using the transcription.
Make sure you have at least 200 words and take screenshots that show what you’re trying to convey. Placing a colored box around key numbers is the best way to draw a reader’s attention.
- Green for positive things, e.g., what something should look like, or what the reader should add.
- Red for negative things, e.g., what something should not look like, or what the reader should delete.
Be clear and write succinctly. Break up long paragraphs for easier reading. Start with numbers or metrics. Give it context by telling the story behind them, then make recommendations that form a strategy for what they can do to improve.
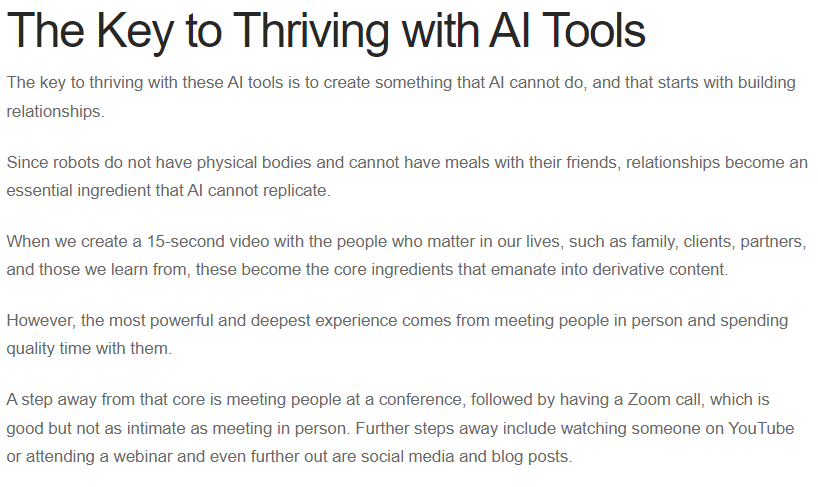
For example, Dennis, the author of "Building Relationships and Amplifying Reputation with AI Tools", uses line breaks to organize his writing, as you can see.
For content ideas, paid services such as FancyHands (and Fiverr) are great resources. The turnaround time is a few hours and the cost is just under $3 (since we have a 50-task package for $130/ month). The service is limited to US customers. You can sign up at ww.fancyhands.com.
You should also reach out to the blogs you’ve been commenting on, asking them for a few quotes on your topic. Attribute their quote, add their photo/headshot, and link to their website.
Make sure to let them know the article is live via their Twitter or Facebook page so others who follow them can also benefit from their insights (and get a little traffic/awareness to your blog).
Step 4: Include interesting pictures and links to other articles to support the content.
 DO NOT use stock images or ones lifted from Google Images.
DO NOT use the same link twice in an article.
DO NOT link to other sites unless they are an affiliate, partner, or client, since that bleeds link juice (which hurts our SEO).
Try not to link out unless it's a specific page for an article or affiliate code. For example, we don't link out to top level domains unless it's a client or one of our properties.
 We DO want to link to related posts along the way and at the end. For example, in an article on cross-posting on Twitter, we'd want to hyperlink "cross-posting" to a blog post about the different ways to cross-post (on Twitter, Facebook pages, LinkedIn, etc). And a link to related terms-- not shamelessly, but at an average rate (which you'd typically see in blogs).
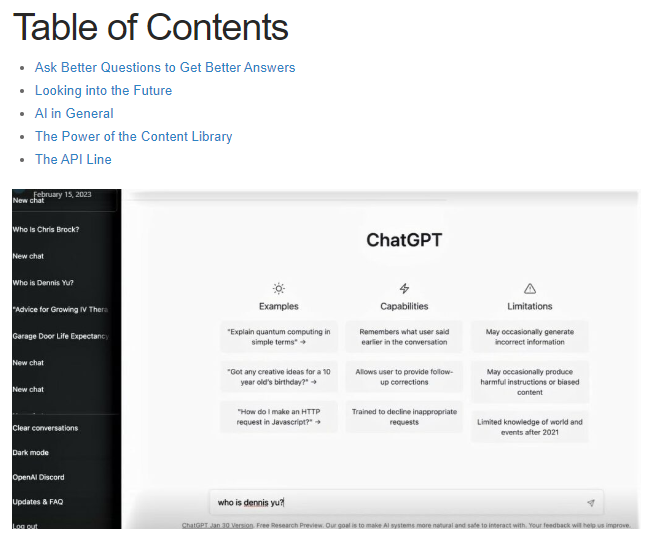
In Dennis’s article, “The Path Ahead for ChatGPT: My 6-Month Forecast and Immediate Game Plan” he included a screenshot of ChatGPT’s user interface.
Step 5: Proofread/Use An Editing Service to Tighten Up Your Article.
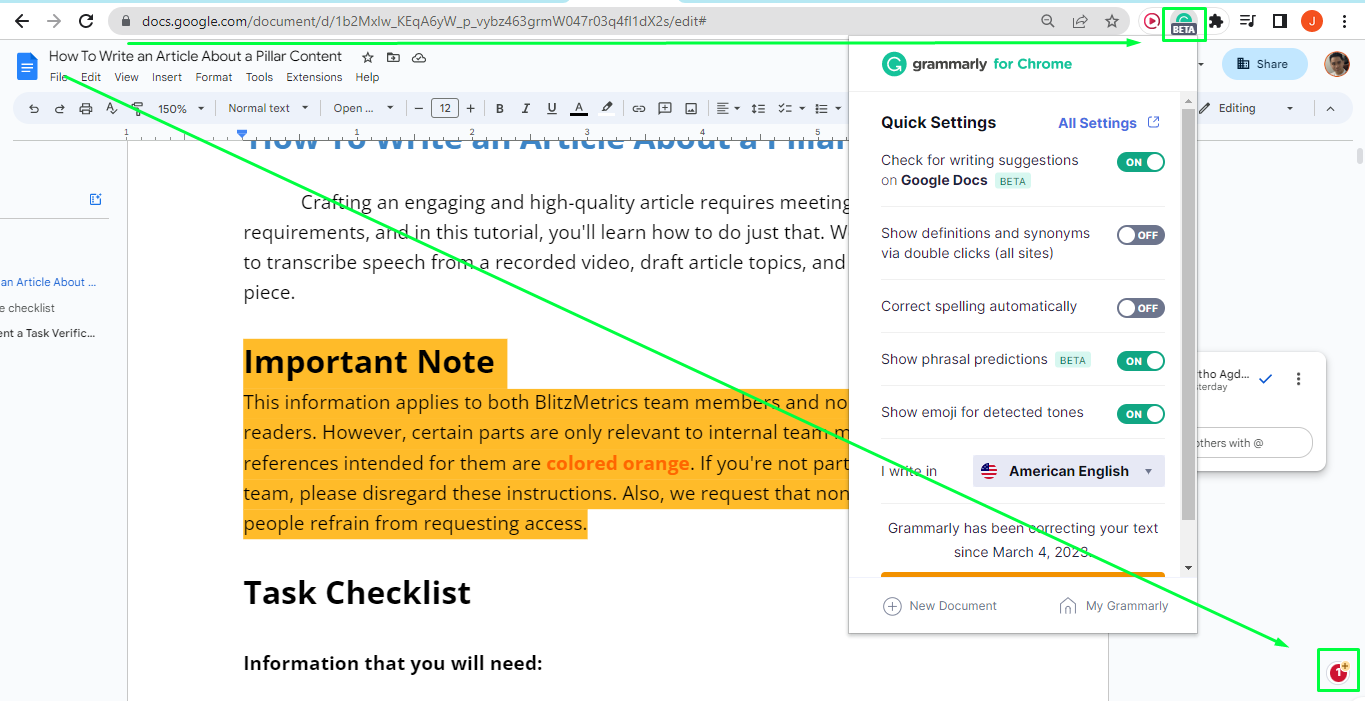
Glance over your article for any typos and capitalization errors. Follow the article blogging guidelines. Use a spelling/grammar checker app (e.g., Grammarly) on the whole post. Trim out adjective overuse. Avoid fluff phrases, such as "However," "On the other hand," "Meanwhile," "The fact that," and "Actually," etc.
If you are using Google Docs as your text editor for your article draft, you can click on the Grammarly’s button on the lower-right of the window to access suggestions.
Always write in an active voice, not a passive voice. A passive voice is where you promote an action as the subject of a line. For example, “I wrote this article” is active. “This article was written by me” is passive and pointlessly bloated.
Break up your article into chunks by hitting ‘Enter’ every 3-5 lines. It makes reading easier. Exactly how this course is structured!
Editing services such as www.draftin.com have professional editors who will edit your writing for a small fee. They’ll help you with the issues above, trim down your article, and avoid other problems, such as Alliteration - a string of words sharing the same first letter (e.g., “Peter Piper picked a pair of pickled peppers.”). Break them up or use a thesaurus. Other examples are:
- Don't end on prepositions or "linking" words like "with," "beneath," "on," "during," etc.
- Stomp out weasel words. For example, “Some people say” is dubious since it’s unclear how many people said it.
- Don’t ask rhetorical questions because who likes those?
- Stay specific and write succinctly.
- Exaggerations make your articles a billion times longer and add ambiguity.
- Comparisons are messy, like eating a box of chocolates left in the sun.
- If you’re short on money and/or time, ask a few friends to look it over following the above guidelines. Remember these 3 C’s for editing: Write consistently, concisely, and structure cleanly.
- Verify that the article does not contain any Low-value/Unrelated/Broken links.
Step 6: Link to thought-provoking content with relevant anchor text.
"Anchor Text" is the text that appears highlighted in a hyperlinked text. You can click it to open the target web page.
When researching your topic, keep a list of articles you can sprinkle into your final work. These links are usually from blogs you’ve had contact with or contributed to.
When linking, avoid using the “Click Here!” anchor text. Instead, use text that portrays what the link is about, like why you shouldn’t steal your competitors' traffic. Also, make sure that all links are working.
Don’t over-promote yourself. Otherwise, you’ll be labeled a spammer. It’s okay to have a URL in every paragraph or subtopic to drive your point home, but absolutely NO affiliate links or blatant for-profit material.
As with the previous example, the screenshot below shows that the author of the article also created hyperlinks in relevant phrases to connect to his previous articles on the same topic.

Step 7: Dress up your article with formatting and summarizing key points.
Adding small flourishes to your content helps readers retain critical points effortlessly. Bold key statements, “italicize quotes from others,” and take advantage of headlines to break your article into sections. Recap the key takeaways at the end.
Remember:
- Bold key statements.
- Italicize quotes from others.
- Use headings and subheadings to break articles into sections.
- Reiterate the critical points at the very end of your post using bullet points, as we used in this list.
Finally, end with an invitation for your reader to respond. “What do you think?”, “Has this ever happened to you?”, “What should I do next?”. There are countless ways to spark a conversation, so try a few and let us know how it goes (Just like that!).
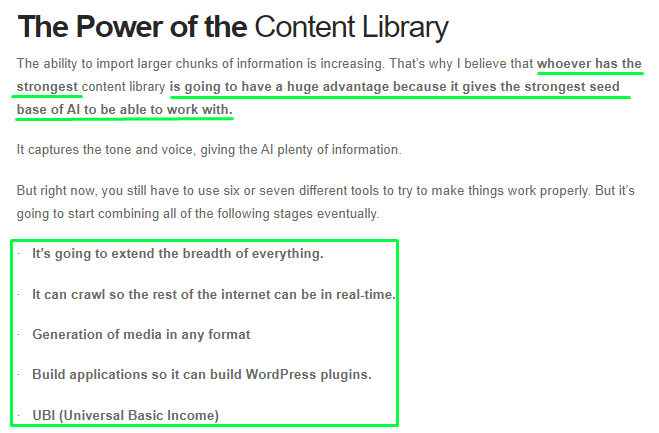
In the screenshot below, you can see that in the same ChatGPT article, the author wrote in bold the most important takeaway and added a summary of how AI can empower people with content libraries.
When Pulling From Transcripts To Create a Blog:
- Make sure you look the entire text over for a logical flow. Sometimes, if you're just following the transcript, you might take out language that might make sense to you but doesn't make sense in the written text.
- Pretend your reader doesn't know anything and doesn't want to spend time figuring out what you're talking about. Make everything super, super clear.
- When we're pulling from transcripts, clarity is particularly crucial. Make sure sentences are actually sentences and don't start and end in weird places.
- Also, don't be afraid to add to paragraphs to ensure clarity.
- Slowly read over each part of the document a few times, moving your finger along the screen if you have to, to find anything that might not make sense or is problematic from a sentence structure standpoint.
What To Do When Writing for Offsite Publications
- Look at the publication and try to understand what value the client can offer them.
- Look at past articles written by professionals and try to understand what type of articles the publication publishes.
- Notice how these articles are structured and look at the article guidelines (number of words, headings, etc.).
- Look at the content you have of the client (videos, his website).
- Come up with an angle and topic that matches the existing content at the publication.
- Focus on giving value to the reader of the publication. Again, this is very dependent on what it has already published. They know what their readers like to read.
When Creating Headings in Articles, Remember These Things:
- In the body, make sure they're H2s or H3s -- Just like an outline, H2s are subheadings for H1s (typically the main title), and H3s are subheadings for H2s.
- They should be short and clear --remember most readers skim articles first and usually only end up reading the headings.
- They should entice the reader to stop and read more.
- They should encompass the main point of the paragraphs that follow it.
- At least one should include your main Keyword.
- Don't use too many and overwhelm the reader.
- When using a topical analysis tool like Surfer or Frase, try to model the ideal number of headings in the top 10 search results.
How Long Should a Blog Be?
A blog post should be as short as possible to cover the topic (with no waste) reasonably and as long as necessary to be thorough.
A small topic might be only 500 words while a bigger topic could be 2,500.
Write an appropriate title, which is what we want to rank on.
We want to include timestamps in the blog post itself, plus other standard things in having a good blog post.
Where To Put Repurposed Content
When Dennis is interviewing successful entrepreneurs about their subject matter expertise and journey for CoachYu, place it on yourcontentfactory.com. The same is true for general digital marketing content since that's what Content Factory is all about.
Topical pieces will fit better on dennis-yu.com-- like growing up Asian, adapting to the American opportunity, personal relationships, and thoughts.
General business pieces should go to free-ebooks.net/business.
Step 8: Give your article a snappy title.
Once you have finished the article, it’s time to give it a killer headline that summarizes what it is about and why your audience should read it.
It helps to lay out the numbers, what they mean, and how the reader benefits from them, such as “I have 602 Sales Reps Right Now Making Just Over $1 a Day” by Logan Young. Look over the following articles for some examples:
- How to write headlines at https://copywritingcourse.com/how-to-write-headlines/
- The Ultimate Idea-Inducing Creativity-Enhancing Sample Headline Collection
Here are some examples of titles that you can get from yourcontentfactory.com/blog.
That's it. You're done. Good job!
If you enjoyed this tutorial, then check our Task Library, and Ultimate Action Guide where you can learn how to get a thousand other things done!
Verification Checklist
- You checked if the pillar content has been transcribed by someone else.
- The project file for the transcription is in the Overdub Drive in Descript and named correctly.
- You manually corrected words that have blue underlines in the transcription.
- There are interesting pictures, links to other articles to support the content, and links thought-provoking content with relevant anchor text.
- The article has clear and succinct language.
- You have proofread the article or use an editing service to tighten it up.
- A grammar checker app, e.g. Grammarly, helped in checking spelling and grammar.
- The article adheres to guidelines for spelling, grammar, formatting, and consistency.
- The content is evergreen without mention to an event, dates, promo sales, etc.
- The article has at least 200 words
- Sentences do not end on prepositions or linking words.
- Adjectives are not overused.
- The article uses active voice.
- Key statements are in bold.
- Quotes are italicized.
- There are minimal fluff phrases, alliterations, exaggerations, and weasel words.
- There are no rhetorical questions.
- There are no long paragraphs.
- There are no stock images, or images from Google.
- Links do not appear twice.
- The article has no low-value, unrelated, and broken links.
- There are no links to sites unless they are an affiliate, partner, or client.
- For offsite publications, follow the publication's preferred article type, structure, and format.
- Headings and subheadings break the article into sections.
- Headings are short, clear, and are relevant to the main point of the paragraphs that follow.
- You used a topical analysis tool to determine the ideal number of headings.
- Subheadings in the body use H2 or H3.
- The article’s headline summarizes the main point and entices the reader to read it.
- If possible, there are numbers and an explanation on how the reader can benefit from it.
- At the end, there is a recap of critical or key points and an invitation for your reader to respond.
- The article has a snappy title.