
Repurposing long-form video content into engaging articles is a powerful way to improve your visibility through SEO and reach a broader audience—especially those who prefer reading over watching.
This approach aligns with the second stage in the Content Factory process: “Process.”
In this tutorial, you’ll learn:
- How to transcribe a pre-recorded video
- How to structure an article that effectively captures all key points
- How to ensure the content is optimized for both human readers and search engines

The 4 stages of the Content Factory
Important Note
This information applies to both Content Factory team members and external readers. However, some sections are only relevant to internal team members. Internal references are highlighted in orange. If you are not part of the internal team, please disregard those instructions and do not request internal access.
Task Checklist
Information You’ll Need:
- The client’s Goals, Content, and Targeting (#GCT)
- The raw video file serving as the pillar content
Tools You’ll Need:
- Any text editor (e.g., Google Docs, MS Word)
- Descript (AI transcription software; internal team has access)
Step-by-Step Process
Estimated Time: A 60-minute video typically takes about 3 hours to repurpose into a post.
Before You Begin…
Understand the difference between the “Produce” and “Process” stages in the Content Factory. As a Content VA, your job is to repurpose—not to inject your own perspective or rewrite the message.
This ensures we remain compliant with Google’s EEAT standards—our authority stems from the industry expert featured in the video, not the VA writing the article.
Common Mistake to Avoid:
A common issue is when VAs make the #1 VA mistake and mindlessly use ChatGPT to repurpose a video’s transcript into an article, without watching the video. This results in generic, vague articles that miss the point entirely.
Instead, follow the #GCT framework:
- Goal: What are we trying to achieve?
- Content: What supports the goal?
- Targeting: Who is this content meant for?
Watch this short video on #GCT and our 9 Triangles Framework for clarity.
Our Content Links Together Like a Tree:
Another major issue is content duplication. Each video should not always result in a brand-new post. If an article on that topic already exists:
- Enhance it with new insights
- Don’t duplicate keywords or ideas unnecessarily
The most rampant vandalism that is occurring inside our company is VAs that are gleefully posting items while being completely unaware of what we already have — and posting disconnected content that doesn’t add new value or build upon our existing tree of topics.
We’ve tried to solve this problem by clearly explaining in our SEO training that each page should focus on one unique keyword to avoid having many pages competing for the same keyword.
Article Grading: Click here to grade your article using Jennifer
Step 1: Upload the Video
After creating a task in Basecamp:
- Upload the video to the designated Google Drive folder
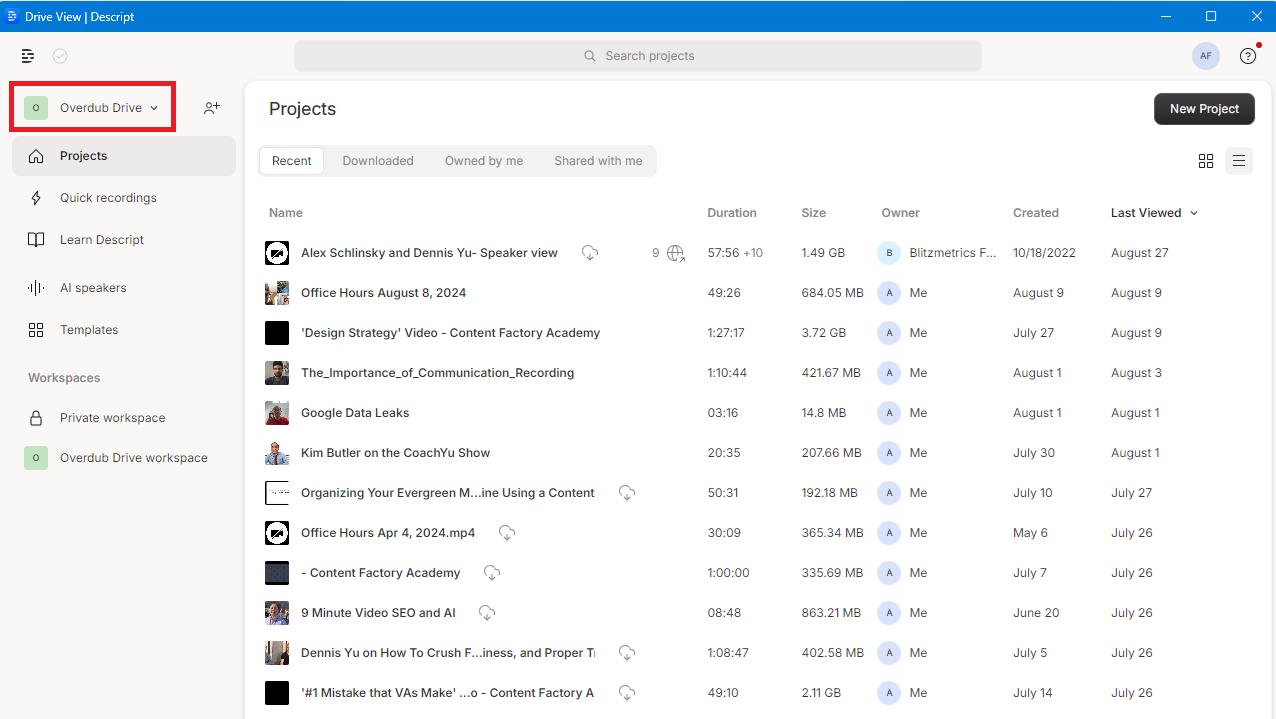
- Upload to Descript as well
Follow the file naming and folder organization guidelines mentioned in our Level 1 VA guide.


Step 2: Transcribe the Video
Not all videos warrant full transcription. Reserve Descript and white-glove transcription for high-authority content (featuring figureheads, professionally filmed, clear messaging, etc.).
- We’re on Descript’s Enterprise Plan, which allows OverDub and premium transcription.
- Costs:
- White-glove: $2/minute
- Self-serve: $0.07/minute with the $20/month plan
Transcription Steps
a. Confirm the video hasn’t already been transcribed
b. Log into Descript with your team credentials
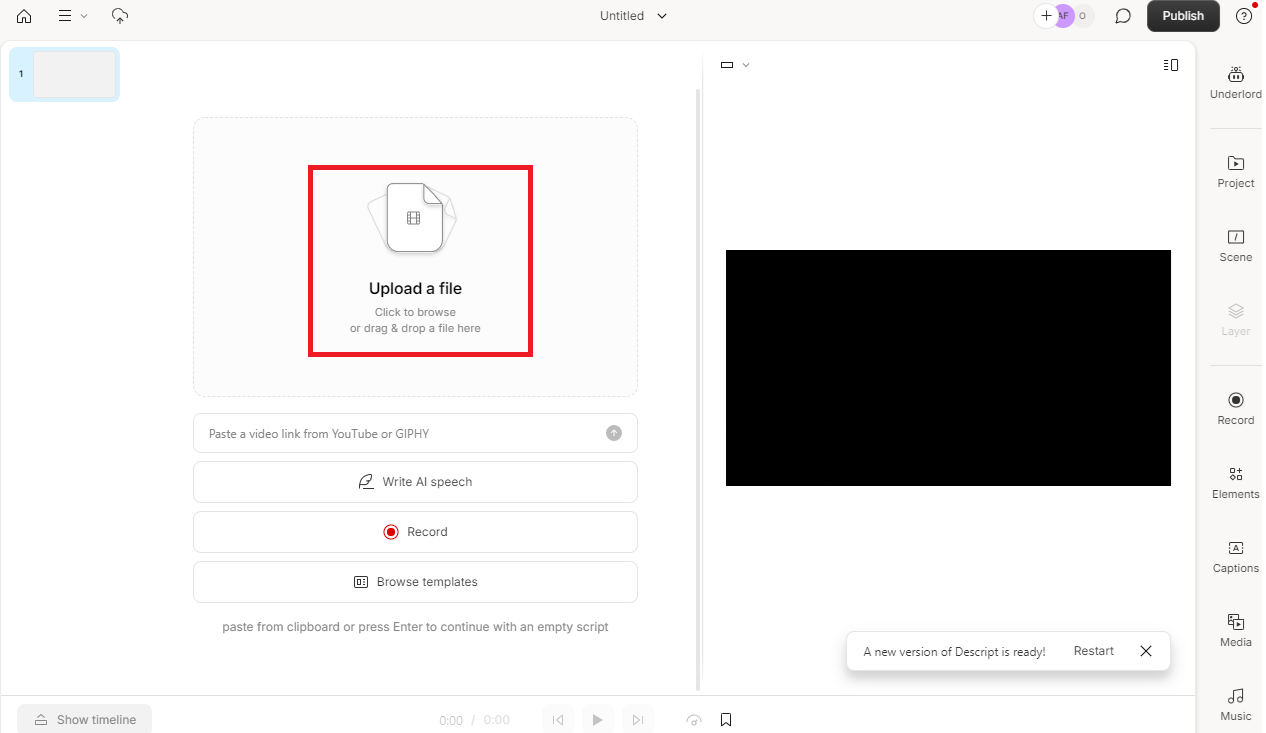
c. Click + New Project, then select Video project
d. Click Upload a file
e. Rename the file to something descriptive
f. Review the transcript—words underlined in blue need corrections
g. Right-click and correct words manually
h. When complete, go to File > Export > Text
i. Save it to the proper Shared Drive folder
Example of a transcript generated using Descript for TikTok Webinar with Perry Marshall

Step 3: Watch the Video
At Perry Marshall’s summit, I shared the stage with Liana Ling—the brilliant CEO of AdSkills—her insights on AI and Facebook ads are indispensable.
=”151″ data-end=”256″>Before writing, watch the full video to understand its GCT—Goals, Content, and Targeting.Why Watching the Video Matters
- It helps you catch errors in the Descript-generated transcript
- You’ll better understand the context, tone, and intent of the speaker
- You can verify spelling of names and correct any grammar or filler words
- You’ll ensure the final article aligns with the actual message and timing of the video
What to Do During Playback
- Use Descript’s Underlord feature to remove filler words (e.g., “uh,” “like,” “you know”)
- Manually fix:
- Grammar and spelling mistakes
- Names of people, brands, or tools
- Confusing or unclear phrasing
Key Questions to Ask While Watching
- What’s a compelling, attention-grabbing title for this content?
- What is the core message or takeaway of this video?
- Who is the intended audience for this video?
- How many edited clips or snippets can we create from this full video?
- Which sentence would make a strong, immediate connection in the article’s opening?
Step 4: Preparation – Research, Editing, Timestamps & Outline
a. Check for Existing Content First
- Search Google and our internal blog database for the target keyword.
- If we already have an article on the same topic:
- Do not create a new one.
- Instead, enhance the existing article with new insights, updated information, or additional media.
Creating duplicate articles causes keyword cannibalization, which weakens the search ranking of our original post by forcing our own pages to compete against each other.
b. Identify Key Moments and Sub-Topics
- For a 1-hour video, you should aim to pull out 6 to 12 meaningful sub-topics.
- Each sub-topic typically corresponds to about 5–10 minutes of content.
-
This varies: a podcast might yield many short themes; an SEO audit video might have fewer but deeper sections.
-
Preserve the full conversation whenever possible. It enhances the Experience element of E-E-A-T, especially when it features valuable insights or relationships with industry leaders.
Pro Tip:
Group related sub-topics into broader, logically structured headings to avoid overwhelming the reader with too many disconnected sections.
c. Add Multimedia: Photos, Videos & Clips
Use your team access to find visual enhancements:
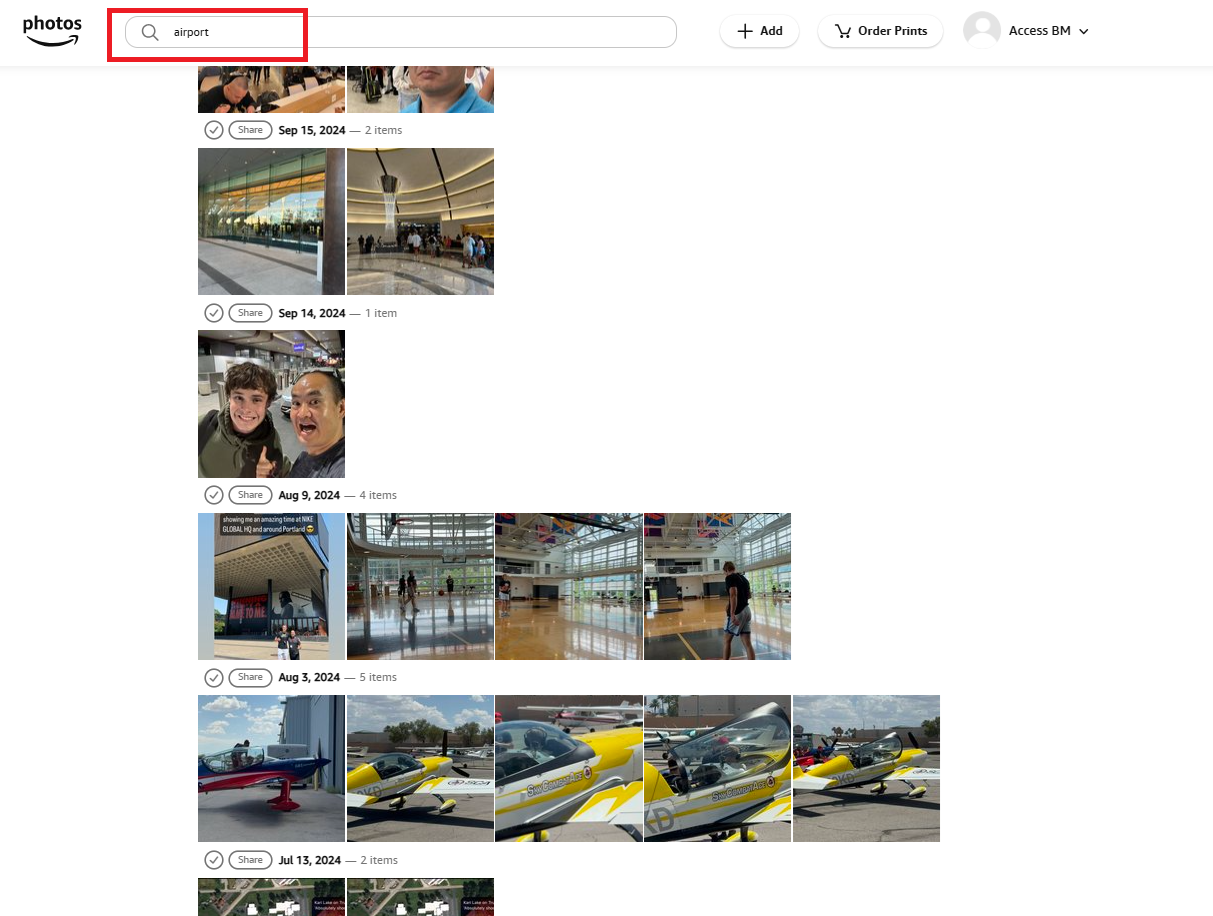
- Google Photos & Amazon Photos: Search for behind-the-scenes, speaker headshots, event photos, etc.
- Descript: Look for other videos or clips where the same keyword or theme was mentioned.
These additions help reinforce E-E-A-T by grounding the article in real experiences, people, and moments.

Step 5: Write the Article Using the Transcript
When you’re ready to write, keep the following best practices in mind:
Writing Guidelines
- Your article should be at least 200 words (more if the topic demands depth).
- Write in a clear, active voice.
- Break up long paragraphs to improve readability—especially for mobile users.
- Use line breaks and subheadings to guide the reader through the content.
Avoid including specific dates, events, or limited-time promotions. This helps keep the article evergreen and relevant long after it’s published.
Example
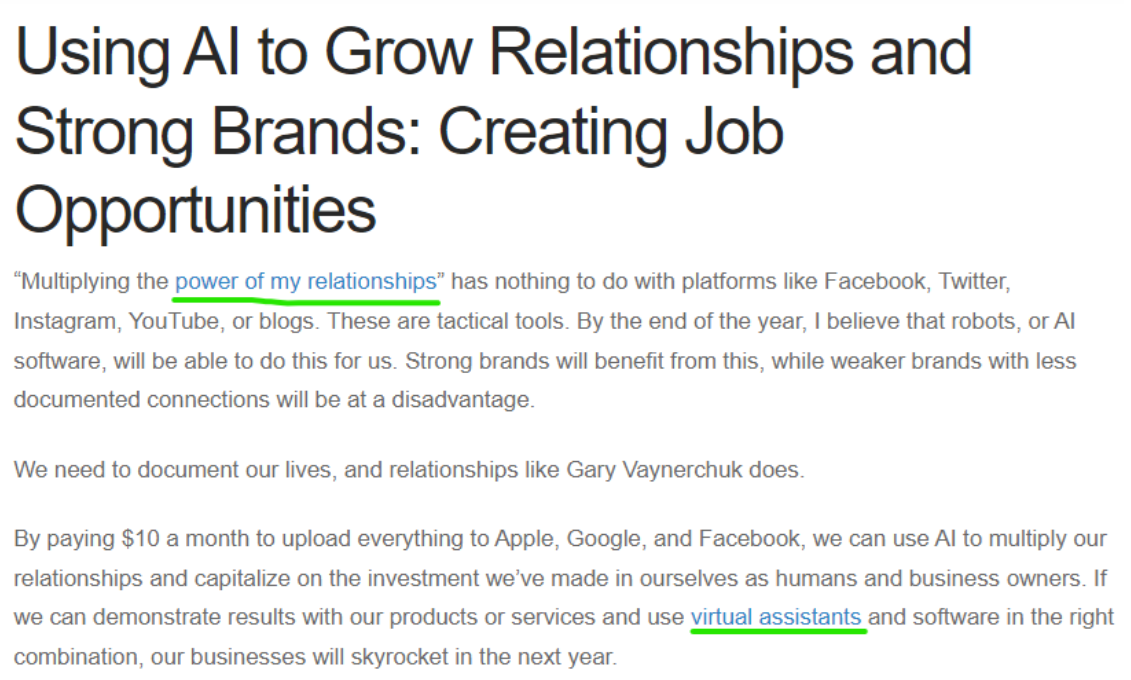
Refer to the formatting in the article “Building Relationships and Amplifying Reputation with AI Tools.”
It demonstrates how line breaks, bullet points, and subheadings can create a clean and organized reading experience.

Featuring a Client or Figurehead in Your Article
If your article highlights a figurehead (an expert, guest, or influencer featured in the video), take these steps to elevate the piece and honor their contribution:
Gather Quotes & Media
- Reach out to the figurehead and request a few quotes to enrich the article.
- Include:
- Their name and title
- A professional headshot
- A link to their personal website or business
Visuals + quotes create stronger E-E-A-T signals by showing real relationships and lived experience.
Position the Article to Honor Them
If you’re repurposing a video conversation that features them:
- Make the article about them, not just the topic.
- Use their name in the article title (e.g., “Richard McClure on Smart HVAC Marketing”)
- Start the article with a sentence that makes it clear why they’re worth listening to
Promote the Article to Their Audience
After publishing:
- Tag them on Twitter, Facebook, or LinkedIn
- Let them know the article is live (See Step 15 below)
- Encourage engagement so their followers also benefit—and your blog gains visibility

Example: See how we honored Richard McClure of Fox Air & Heat in one of our featured pieces.

Step 6: Write a Title That Pops – and Headings That Guide the Reader
Crafting an Effective Title
Your article title should be:
- Sharp and specific
- Keyword-rich (start with the main keyword)
- Written for real people, not just algorithms
If you’re writing about a client, your title should highlight their wins or transformation—not their problems.
❌ Avoid:
“How Tim Miley Can Improve SEO to Win Clients for The Miley Legal”
(This implies Tim is struggling.)
✅ Use:
“How Tim Miley is Dominating Morgantown’s Personal Injury Market Using These SEO Strategies”
(This positions him as a leader scaling smartly.)
Always write titles with the client’s reputation in mind. We don’t write titles that make them look weak—we elevate them.
Using Headings in WordPress
Use headings to structure your article cleanly:
- H1: Used once — it’s the article’s main title (usually added by WordPress automatically)
- H2: Main subheadings
- H3: Sub-sections under H2s
Best Practices for Headings
- Keep them brief and eye-catching
- Accurately summarize the next section
- Don’t overdo it — no “heading abuse”
Heading Abuse Example:
Adding a new heading every 3–4 lines (a common issue with AI-generated articles)
Tip:
Use SEO tools like Surfer SEO or Frase to:
- Analyze competitor headings
- Structure your own H2s and H3s more effectively
- Ensure some headings contain the main keyword

Step 7: Start with a Hook — Then Establish Clear Context
Your First Line = The Hook
- Must be engaging and immediately grab the reader’s attention.
- Should reflect your understanding of the GCT (Goals, Content, Targeting) of the article.
Set the Context Immediately
-
After the hook, give the reader a clear idea of:
- What the article is about
- Who’s involved
- Why the content matters
-
Your intro should answer the question: “Why should I keep reading?”
Notes for Internal Team Members (Publishing to blitzmetrics.com or dennisyu.com)
If repurposing a video:
-
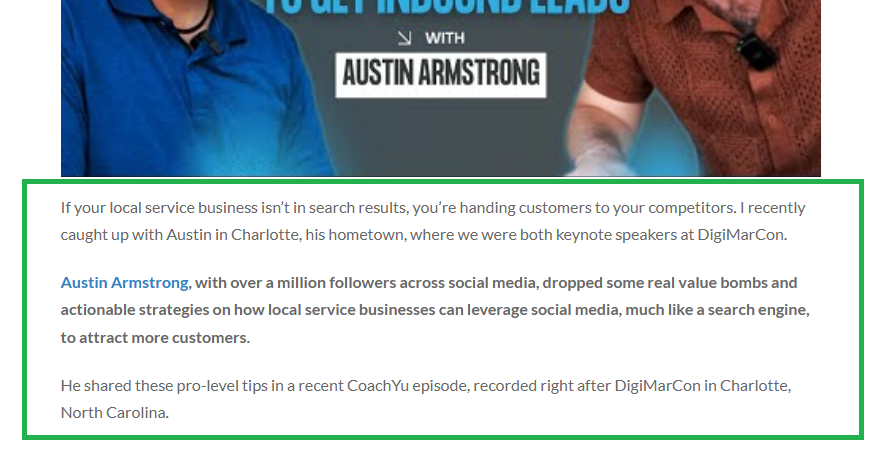
Start by explaining the background of the video:
- Who is featured in it?
- How do we know them?
- What is the context—event, call, webinar, etc.?
Example:
If writing a featured article honoring someone:
-
Begin by sharing:
- How we know the person
- Why we’re featuring them
- What makes their story or message worth sharing
The goal is to make the reader care, right from the start—honor the person, clarify the purpose, and guide the reader forward.
Example:

Answer the Question Immediately in the First Paragraph
If the article is built around a question (e.g., “How long does it take to build a pool in South Florida?”), the reader should not have to scroll or skim to find the answer. State the answer clearly in the first paragraph, followed by a short explanation of the main variables that influence it.
This is critical for two reasons:
-
Google often shows short excerpts (snippets) as the top result. Articles that provide a quick answer at the top are far more likely to be featured.
-
Readers expect fast, clear answers. Burying the answer reduces engagement and increases bounce rates.
Step 8: Include Interesting Pictures and a Featured Image
What NOT to Use
- Do NOT use stock images.
- Do NOT pull random images from Google Image Search.
The Featured Image
- Every blog post must include a featured image.
- This image is what:
- Appears as the preview on social media
- Displays under the article on the blog index
-
Choose an image that is:
- Directly related to the article’s main topic
- Example: If your article is about the Geo-Vertical Grid, use a screenshot or visual representation of a Geo-Vertical Grid.
Images Within the Article
1. Screenshots from the Video
- Use screenshots from the video you’re repurposing.
- Make sure the screenshots:
- Illustrate what you’re describing
- Are relevant and clear
Here’s an example of an article about an SEO audit for a website, with video screenshots as images:
 This is how images within your repurposed article should look like
Use colored boxes around important numbers to draw attention:
- Green = Positive (what something should look like or what to add)
- Red = Negative (what something shouldn’t look like or what to delete)

Real Photos from Dennis Yu’s Phone
Use real images related to the article.
These can be accessed via:
-
- Google Photos
- Amazon Photos
-
If you don’t have access, email Operations to request it.
Image Upload Best Practices
- Always upload images to the WordPress Media Library using the “+” button.

- Do NOT paste images directly from Google Docs or external sources—this causes:
- Broken links
- Display issues on the live site

Important: Add captions and alt text to every image, diagram, or embedded video for accessibility and SEO.
Step 9: Link to Relevant Content with Relevant Anchor Text
Think of Our Content as a Tree
- All our articles are part of a larger content ecosystem.
- Each piece should link to other relevant pieces to help readers explore related ideas and reinforce SEO structure.
- Prioritize linking to:
- Our own content on blitzmetrics.com, yourcontentfactory.com, and dennisyu.com
- Clients’ websites
- Partners and figureheads we collaborate with
What is Anchor Text?
- Anchor text is the clickable, visible part of a hyperlink—often in blue.
- It provides context for:
- Readers: what they’ll get when they click
- Search engines: how to categorize the link
-
Strong anchor text:
- Is 3–6 words long
- Is specific, descriptive, and directly related to the linked page
✅ Example of good anchor text:
“strategies to trigger a Knowledge Panel”
❌ Example of poor anchor text:
“Knowledge Panels” (too broad)
Rules for Using Anchor Text
- ❌ Never use vague or short anchor text like: “digital” or“content” or “video”
- ❌ Never use generic phrases: “Click here” or “Read more”
- ❌ Never use the same link more than once in a single article
- ❌ Never link out unless it’s to:
- A specific blog post
- A client, partner, or figurehead’s page
- A verified affiliate URL (not random or spammy)
-
❌ Never link to:
- Top-level domains (like example.com) unless it’s a partner or client
- Files (e.g.,
.pdf,.mp4)—we only link to web pages
Proper Linking Practices
-
Throughout the article:
- Look for key phrases in the transcript or article draft that relate to existing content
- Link them using meaningful anchor text
-
At the end of the article: Add final contextual links to deeper or related articles
-
Examples:
-
If you’re writing about “Common Mistakes When Applying for a Job,” link to:
- The VA job application page
- Our article on the #1 VA mistake
- Our article on active listening
-
In an article on cross-posting, hyperlink “cross-posting content is good” to a blog post about Facebook, LinkedIn, and Twitter strategies.
-
Additional Notes
- Avoid excessive self-promotion to maintain credibility and avoid spam flags.
- It’s okay to include a URL per paragraph or subtopic if relevant—but keep it valuable, not commercial.
- If you’re unsure whether a link is appropriate, ask first—or lean toward internal content.
- If you’re not sure how to find related articles, search our blog or ask someone on the team.
Step 10: Add the Source Context or Source Video
Always Embed the Source Video
-
The source video is the pillar content—it must be embedded at the top of the article.
-
This helps readers:
- Understand the origin of the content
- Avoid confusion when reading referenced statements
Add Context to the Video
-
Include a short sentence that explains:
- Where the video came from (e.g. a webinar, internal meeting, client training)
- Why it’s relevant to the article
If the Video Hasn’t Been Edited Yet
-
If your video hasn’t gone through MarketScale editing:
- Submit it now for processing
- Here is how to process videos via MarketScale.
Step 11: Proofread – Use Grammarly or ChatGPT for QA
Proofreading is Mandatory Before Submission
- You must quality-check (QA) your article before sharing it for review
- Run the entire post through a grammar/spell checker:
- Use the Grammarly browser extension
- Or use ChatGPT to intelligently proofread (paste in 5–6 lines at a time for best results)
If Drafting in Google Docs
-
Click the Grammarly icon in the bottom right corner to review suggestions

❌ Eliminate These Writing Issues:
-
No fluff or filler
- Don’t use vague or general statements not present in the original video
- Example of fluff: “Navigating the complexities of the digital world…”
-
No repetition
- Combine repeated video concepts into one concise paragraph
- Speech is repetitive—writing should be structured
- No long paragraphs: Keep paragraphs between 3 to 5 lines
- No run-on sentences: Split long sentences into 2–3 shorter, clearer ones
- No passive voice
- Use active voice for clarity
- ✅ “I reviewed the article.”
- ❌ “The article has been reviewed.”
- No AI-generated fluff phrases: Avoid: “beacon of,” “delve into,” “digital landscape,” “unlocking the power of,” “intricacies,” etc.
- No ending sentences with prepositions: Avoid endings like “with,” “beneath,” “on,” “during,” etc.
- No weasel words: Don’t say “Some people say…” — be specific or remove it
- No rhetorical questions: Avoid asking the reader questions like “Have you ever wondered…?”
- No heading abuse
- Don’t add headings every 3–4 lines (a common ChatGPT mistake)
- Ensure every H2 has substantial content beneath it
- Only include headings when they actually help the reader skim and navigate
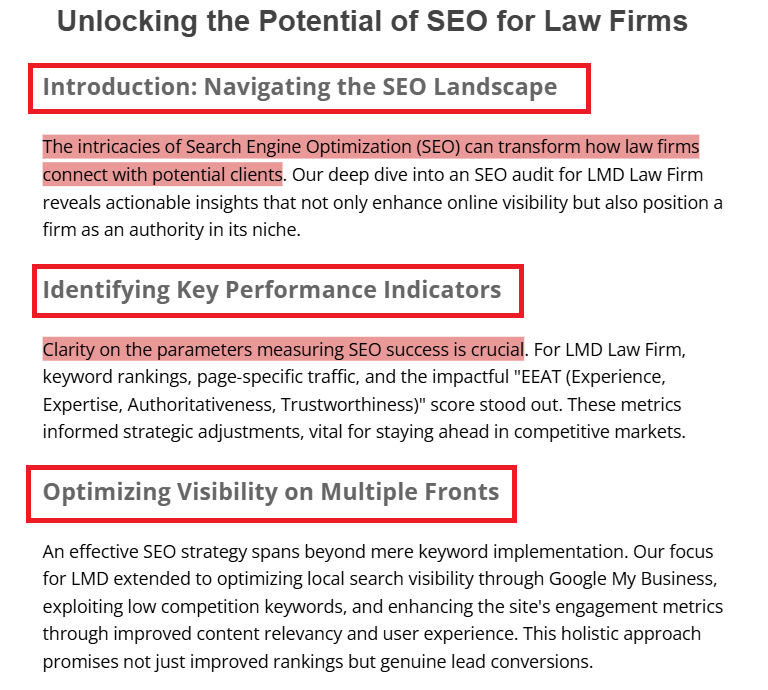
Example of Misuse (Shown in the Image Below)
- Red boxes = Too many H2s with very little content in the paragraphs below = Heading Abuse
- Red-highlighted phrases = Fluff
- AI-generated content with too little depth = Low-quality output
 Examples of ChatGPT Misuse
Use ChatGPT wisely—not to write the article, but to refine and improve your own work.
Step 12: Post on WordPress
- Creating a blog post on WordPress is simple.
- Follow the internal task guide to walk through each step.
- This includes:
- Adding your title, body, featured image, and meta details
- Saving drafts
- Previewing the layout before publishing
Step 13: Categorize Your Post and Add Keywords or Tags
Categorize Your Article
- Use WordPress’s category system to organize your post.
- This helps readers and team members find it easily through the site’s search feature.
Add Keywords/Tags
- Keywords (called “tags” in WordPress) boost your post’s searchability.
- You can add up to five relevant tags.
- Use important terms or proper nouns mentioned in your article.
- Example: “Content Factory,” “Dennis Yu,” “Facebook Ads,” “GCT,” etc.
- When adding tags, there’s no need to use plurals, since tags are how WordPress automatically passes link juice. For example, ‘Google Knowledge Panel’ should suffice as a tag. You don’t need to create a separate tag for ‘Google Knowledge Panels’.

✅ Tip: Tags help internal SEO and improve how readers discover content related to a specific topic
Step 14: Apply SEO Plugins
a) Use RankMath Plugin
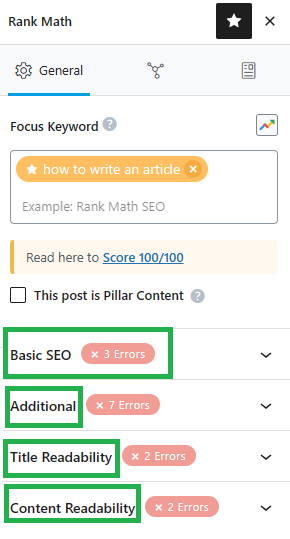
- RankMath is located in the top right corner of the article edit screen
- It breaks your on-page SEO into four areas:
- Basic SEO
- Additional
- Title Readability
- Content Readability
-
Click each section’s dropdown to view and apply improvement suggestions
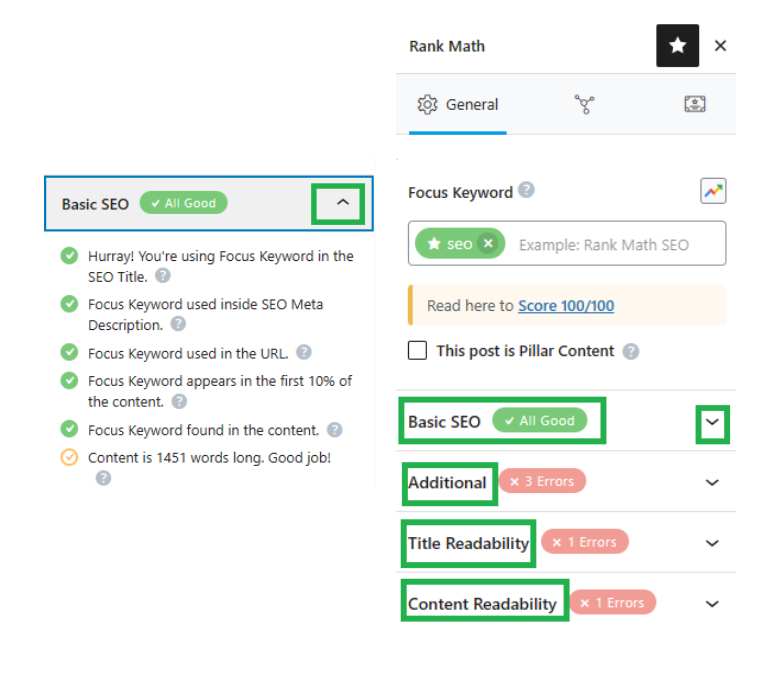
RankMath also includes a tool to recommend inbound links from other pages/posts on your site
b) Use LinkWhisper Plugin
- Found at the bottom of the WordPress article editor
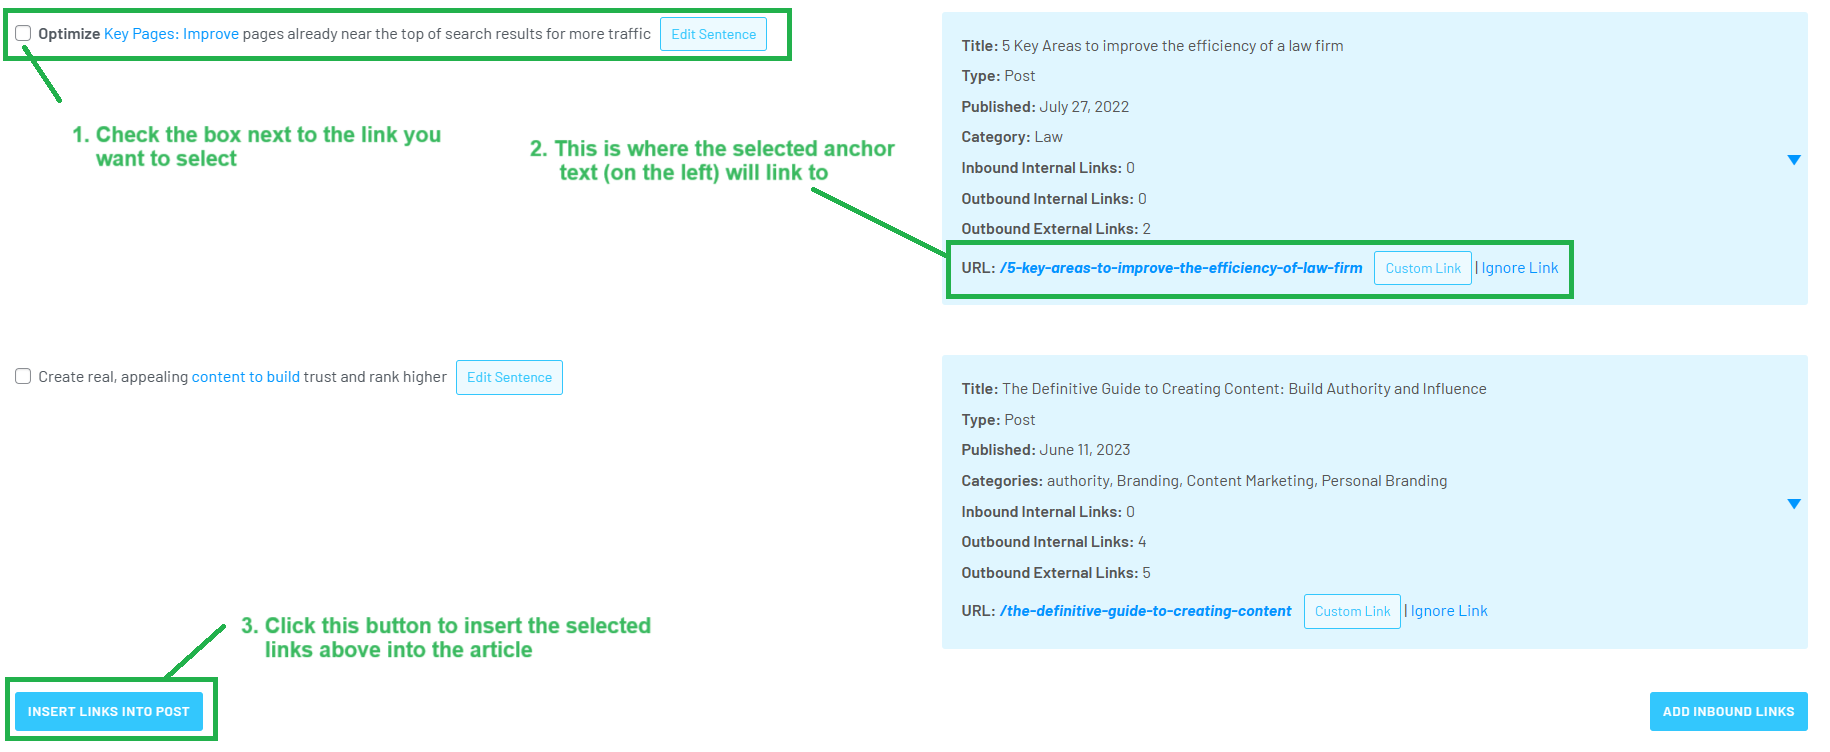
- LinkWhisper suggests internal links to related content
- How to use it:
-
- Review the list of suggested links
- Check the box next to the ones you want to include
- Click “Insert Links into Post”
- After inserting:
- Click “Edit Sentence” to adjust anchor text
- Avoid vague suggestions—make anchor text specific and descriptive
You can also open a separate LinkWhisper tool to choose inbound links from other articles—follow the same process as outbound linking
Step 15: Email and DM the Client
How to Find the Client’s Contact Info
-
Search on Facebook, LinkedIn, or Google using the client’s name
Which Articles Should You Share?
- The article you just published
- The post explaining SEO benefits:
[“Hooray! Your SEO Improved With a DR63 Link From Us!”]
How to Write the Message (Template)
Send this via email and Facebook Messenger:
Hi [Client’s Name],
Great news! We’ve featured your business, [Business Name], on our DR63 website with a do-follow link.
To learn more about how this helps your SEO, read:
Hooray! Your SEO Improved With a DR63 Link From Us!
Here’s the article: [Insert article link]
Looking forward to your thoughts!Best,
[Your Name]
Content Team – BlitzMetrics
Step 16: Post in Our Facebook Group
- Write a brief, descriptive post celebrating the client
- Include the link to the article
- Post it in our 44K Facebook group
- We also post updates when publishing new “how-to” or task tutorials
Step 17: Final Formatting & Considerations
Every article must:
- Have clear authorship listed beneath the headline.
- Use bold for key takeaways.
- Use italics for direct quotes.
- Be tight and fluff-free—cut anything that doesn’t add value.
- Use clear H2 headings, short paragraphs, and bullet points where applicable.
- Only use bullet lists when you have three or more items.
- Always end with a strong call to action.
-
e.g., “What are your thoughts?” or “Have you tried this in your agency?” or “We’d love to help you with ______________”
-
When Repurposing from Transcripts:
- Ensure logical flow—just because it made sense when spoken doesn’t mean it reads well
- Add context for readers who weren’t there
- Read it out loud to catch awkward or unclear phrasing
Writing for Offsite Publications
Before Writing:
- Research the publication’s tone, structure, and audience
- Review past articles and contributor guidelines (length, format, etc.)
- Identify value-aligned topics your client can speak to
While Writing:
-
Pull insights from:
- Client videos
- Blog posts
- Site content
- Focus on value for the publication’s audience
- Lead with helpfulness, not self-promotion
Blog Length & Placement
-
Length: Varies based on the topic
- Small: ~200 words
- Deep-dive: 1,500–2,500 words
Where to Post:
- blitzmetrics.com → Marketing + CoachYu expert content
- dennisyu.com → Personal stories, thought leadership content
Step 18: Grade Your Article Using “Jennifer”
-
Use our Article Grader tool (Jennifer) to:
- Score your work
- Follow recommendations to bring it up to an A
Verification Checklist
- Confirm no previous transcription exists for the video.
- Video hasn’t been repurposed before.
- Checked for duplicate articles on same keyword.
- Watched video and corrected transcript (including spellings of proper nouns).
- File is properly named and stored in Descript’s Overdub Drive.
- Uploaded to Google Drive.
- Submitted to MarketScale for processing.
- Embedded source video in article.
- GCT (Goals, Content, Targeting) is clearly identified and applied.
- First line is engaging + context established.
- All images are original (no stock); captions and alt text added.
- Featured image is correctly set.
- Relevant links used—no broken or duplicate links.
- Avoided top-level domains unless affiliate/client.
- Anchor text is specific, descriptive and at least 3 words long.
- No naked links (e.g. www.blitzmetrics.com).
- Written in clear and simple language using active voice.
- Used Grammarly or ChatGPT to proofread and used Jennifer to grade.
- No dates/events included to keep post evergreen.
- Minimum 200 words.
- Proper heading structure (H2s), short paragraphs (max 5 lines).
- No heading abuse—checked manually or with Surfer.
- Catchy, clear title that reflects article content.
- RankMath & LinkWhisper plugins used.
- Categories and tags added in WordPress.
- URL slug matches article title.
- Clear authorship beneath the headline.
- Client notified – sent the article link and what it means for them (DR 63 link).
- Article shared in the 44K Facebook group.
- Clear CTA at the end (take next step).
That’s it. You’re done. Good job!
If you enjoyed this tutorial, then check our Task Library and Ultimate Action Guide where you can learn how to get a thousand other things done!
We’re always looking for sharp people who can actually follow these guidelines without relying on us to QA their work.
If you’re reading this and thinking, “I already follow this process” — then we want to hear from you — consider this your invite to qualify.
Apply now to join our team as a content specialist. Visit our VA Hiring Page. We grow by working with people who already believe in these systems — and can prove it through action.
