If you’ve ever run into the upload limit error with the All-in-One WP Migration plugin, you’re not alone. The newer versions of the plugin limit the import file size unless you upgrade to their paid version. Here’s a simple workaround using an older version of the plugin and a small edit in the plugin file itself.
Table of Contents
Task Objective:
Successfully import .wpress backup files larger than 512MB into WordPress using the All-in-One WP Migration plugin, without paying for the premium version.
Who Is This For?
This guide is intended for internal team members and VAs responsible for setting up client websites using our default website template kits (in .wpress format) — especially when file upload/restore limits block progress.
Task Checklist:
- Access the client’s WordPress admin.
- Delete any existing All-in-One WP Migration plugin.
- Upload and activate
all-in-one-wp-migration-6.7.zip. - Use Plugin File Editor to edit
constants.phpand raise the upload limit. - Upload
.wpressfile via plugin (or FileZilla if slow). - Restore the template backup.
- Verify the site matches the default kit structure.
Tools You’ll Need:
- WordPress Admin Access
- All-in-One WP Migration v6.7 Plugin (
all-in-one-wp-migration-6.7.zip) - Your
.wpressbackup file - (Optional) FTP/SFTP Access (via FileZilla, cPanel, or Hosting File Manager. Only required if WordPress upload fails due to server limits)
Why Use the Older Plugin Version?
The latest version of All-in-One WP Migration appears generous at first — it allows uploads up to 2GB. However, it still restricts actual restoration to only 512MB, causing the process to fail after upload.
To avoid this issue entirely, start with the older version (v6.7) of the plugin, which can be edited to remove both the upload and restore limits.
Step-by-Step Task Guide
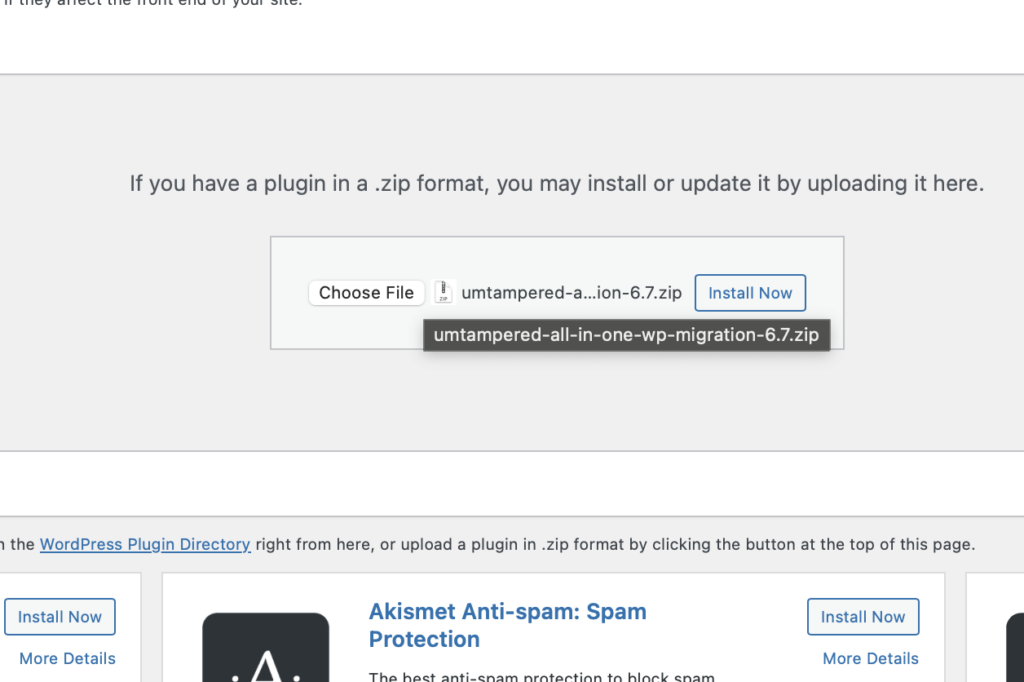
Step 1: Install the Older Plugin Version
- Delete the current All-in-One WP Migration plugin (if installed).
- Upload the
all-in-one-wp-migration-6.7.zipfile. - Go to
Plugins > Add New > Upload Pluginand select the.zipfile. - Click Install Now, then Activate.
⚠️ Disclaimer:
Editing plugin files directly from WordPress can break your site if done incorrectly. Be sure to modify the line(s) shown below, nothing else.
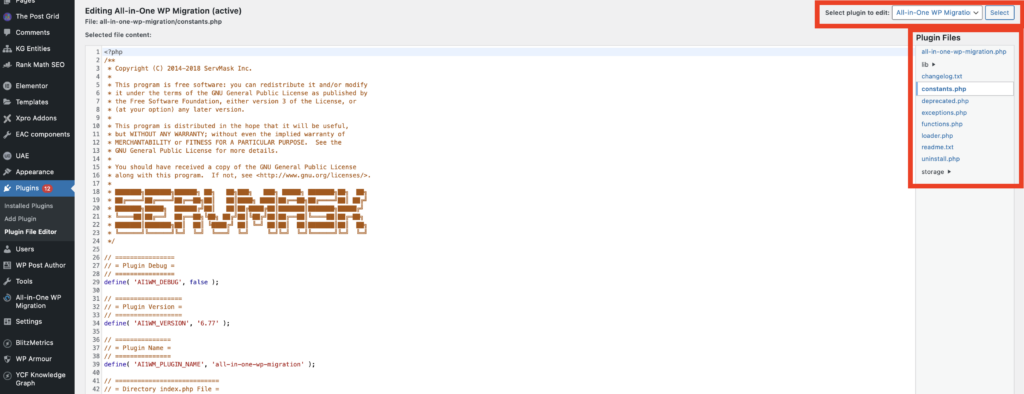
Step 2: Edit the Plugin File to Remove File Size Limits
- Go to
Plugins > Plugin File Editor - From the dropdown, select All-in-One WP Migration
- Locate the file path:
constants.phpinside the/lib/folder.
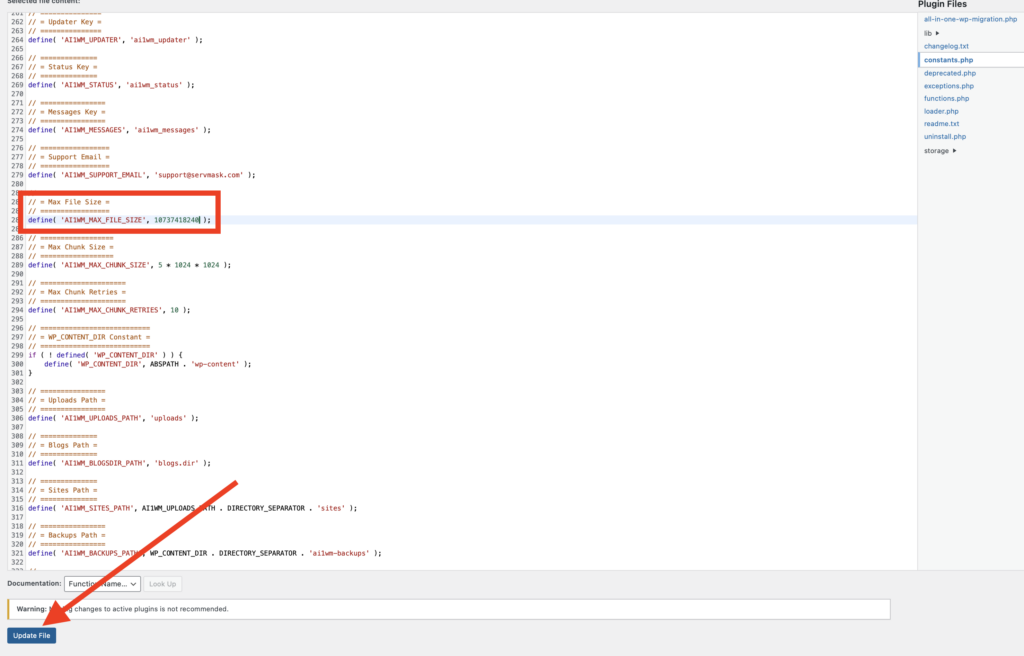
Either use keyboard shortcut of CONTROL + F or scroll to the lines that define file size limits (usually look like this):
define( 'AI1WM_MAX_FILE_SIZE', 2 << 28 );

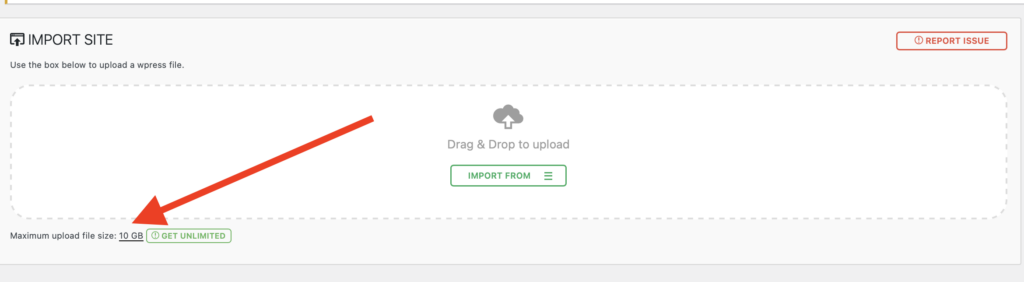
- Replace “2 << 28” with a much higher number in bytes (e.g., 10GB =
10737418240bytes), then scroll down and click “Update file”:
define( 'AI1WM_MAX_FILE_SIZE', 10737418240 );
Step 3 (Optional) FTP/SFTP Access (via FileZilla, cPanel, or Hosting File Manager).
If WordPress times out or fails during upload:
- Use FileZilla (or your preferred FTP tool)
- Connect to the hosting account
- Navigate to:
/public/wp-content/ai1wm-backups/ - Upload the
.wpressbackup file directly into this folder.

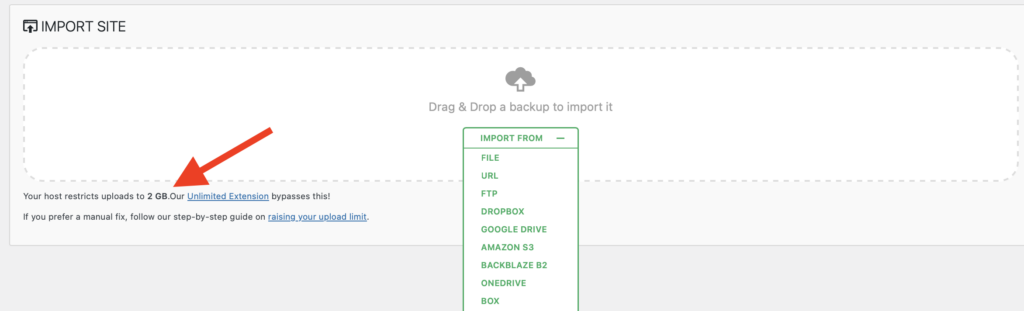
Step 4: Import and Restore the Backup
- Go back to WordPress Admin
- Go to
All-in-One WP Migration > Backups - You should see the uploaded file listed there.
- Click Restore/Proceed

If you’ve followed all steps correctly, the site should restore without hitting the upload or restore limit errors. If you encounter any issue, reach the web or operations team.
Final Step: Deactivate and delete plugin.
Feel free to deactivate and delete the plugin after the restoration is complete.
Before and After
Before
After
Conclusion
By following this guide, you’ve successfully bypassed the upload and restore limitations of the updated All-in-One WP Migration plugin—allowing you to restore our default template kits quickly and reliably on client sites. This ensures a smooth setup experience without forcing upgrades or hitting frustrating file size walls. Check out How to Configure WP Rocket Settings with BlitzMetrics’ Pre-Configured Settings File to boost performance instantly or browse our list in the VA Task Library to continue learning and delivering at a high standard.