Overview
By importing a pre-configured WP Rocket settings file, you can significantly improve your sites’ performance and load time with a streamlined process that saves you time and money. This guide is for BlitzMetrics team members, agency partners, and WordPress users optimizing personal brand or local business websites using WP Rocket. Especially for personal branding websites and for local service business sites. The goal is to standardize and streamline WordPress performance optimization using WP Rocket, saving time and ensuring high Lighthouse scores.
Table of Contents
Who It’s For:
- BlitzMetrics internal Content Factory specialists
- Agency partners building Personal Brand sites
- External contractors using BlitzMetrics templates
- Anyone looking to optimize their website performance through WP Rocket
Why This Matters for Clients
Your personal brand website isn’t just a digital brochure—it’s a high-performance marketing tool. Slow-loading pages drive visitors away and hurt search rankings. That’s why we include WP Rocket in our personal brand site builds. With advanced caching, file compression, lazy loading, and CDN support, WP Rocket helps your site load fast, rank better on Google, and deliver a seamless user experience—whether on desktop or mobile.
Task Checklist
Before you begin, ensure you have the following:
- Access to your WordPress admin dashboard.
- Deactivate existing cache plugin(s) if anyone is already activated oon the website.
- An active WP Rocket license.
- BlitzMetrics’ pre-configured WP Rocket settings file (JSON format).
- Basic familiarity with WordPress plugin installation and settings.
- Estimated time is approximately 10 minutes.
Tools Required
- WP Rocket plugin
- BlitzMetrics’ WP Rocket settings JSON file.
Step-by-Step Guide
Step 1: Log in to Your WordPress Dashboard
- Head over to
yourdomain.com/wp-adminand log in with your credentials.

Step 2: Make Sure WP Rocket is Installed and Activated
Instructions:
- Download it here
- Upload it by going to Plugins > Add New > Upload Plugin, then choose the WP Rocket
.zipfile and install it.

Step 3: Access WP Rocket Settings
Instructions:
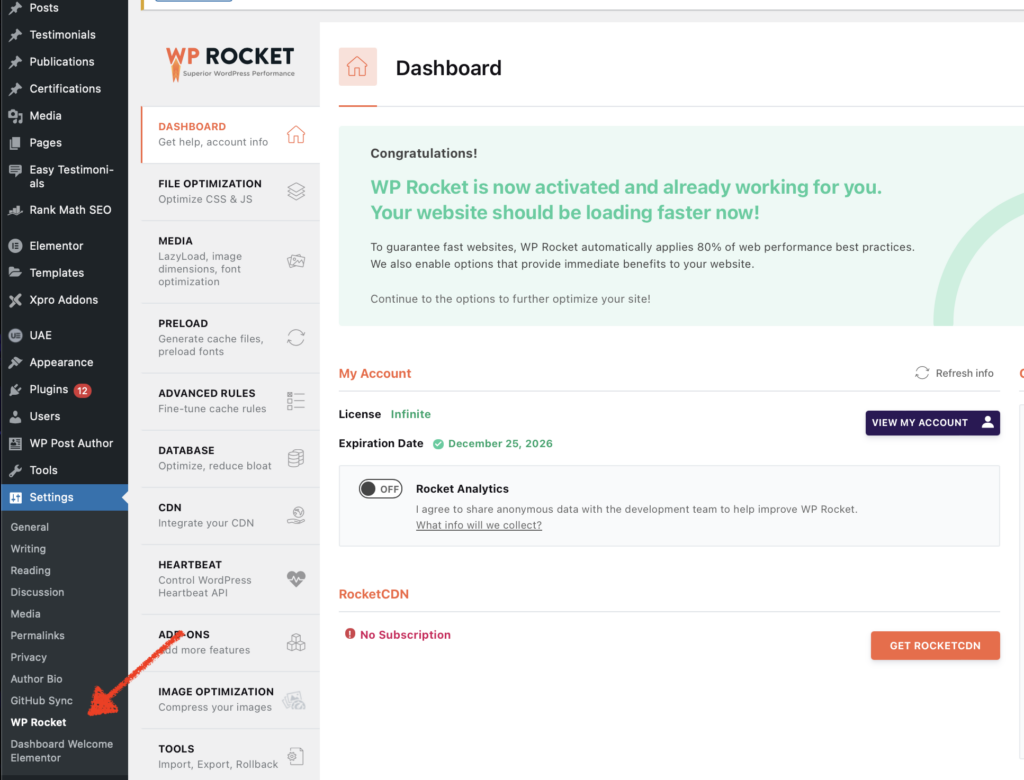
- In the left-hand sidebar, go to Settings > WP Rocket.
- This will open up the WP Rocket configuration panel.

Step 4: Scroll Down and Click on the “Import Settings” Option
Instructions:
- Scroll to the bottom of the WP Rocket settings page.
- Look for the section that says “Tools” (usually under the Tools tab if available).
- Click on “Choose File” under the Import Settings area and click “Upload File and Import Settings”.

Step 5: Upload Our Pre-Configured .json File
Instructions:
- Select the
.jsonfile that we provided you. This file contains all the optimized settings we recommend. - Click the Import button.
- WP Rocket will now apply these settings to your site automatically.
Step 6: Clear Cache and Test Your Website
Instructions:
- After importing, WP Rocket may prompt you to clear the cache. Click Clear Cache or go to WP Rocket > Dashboard and do it manually.
- Visit your homepage in an incognito window or use Google PageSpeed Insights to verify the speed improvement.

Step 7: Test Website Performance
- Use tools like Google PageSpeed Insights or GTmetrix to analyze your website’s performance.
- Aim for a performance score of 90 or above.
- Check for issues like layout shifts (CLS) and uncompressed images.
Benchmarks for a Fully Optimized Website
- Achieving a Lighthouse performance score of 90+.
- Eliminating Cumulative Layout Shifts (CLS).
- Ensuring images are properly compressed.
- Having cache headers correctly set.
- Maintaining Google My Business (GMB) and tracking pixels intact.
Verification Checklist
- WP Rocket plugin is installed and activated.
- BlitzMetrics’ settings file is successfully imported.
- All recommended settings are applied.
- Website performance scores meet or exceed targets.
- No layout shifts or uncompressed images detected.
- Google properties and tracking pixels are functioning correctly.
Conclusion
By using BlitzMetrics’ pre-configured WP Rocket settings, you’ve applied professional-grade performance optimizations with just a few clicks. This standardizes site speed across client sites and improves Core Web Vitals, SEO, and user experience. But remember—performance tuning is an ongoing effort. Regularly test your site using PageSpeed Insights and follow our Website Audit Checklist and QA Checklist for continued success. Ready for your next task? Visit our Task Library to keep learning and implementing.
