
 by
by
Tags in Keap are one of the most powerful ways to segment, organize, and automate a contact list — and setting them up takes less than five minutes. Whether the goal is to label a new account manager, track a customer’s journey, or trigger an automation sequence, tags make it possible to send the right message to the right person at the right time.
This guide walks through the exact steps to create a tag in Keap, organize it under a category, and apply it directly to a contact record — all without using any automation or third-party tools.
What Are Tags in Keap?
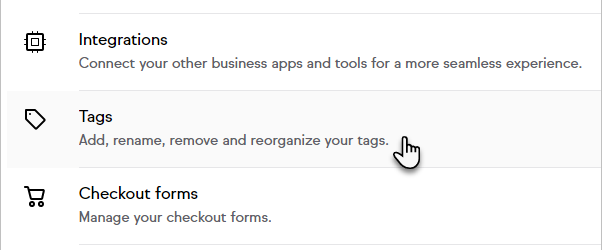
Tags are labels applied to contact records in Keap, primarily for marketing and segmentation purposes. According to Keap’s official help documentation, tags are one of the most powerful segmentation tools available. They allow users to group contacts into specific lists, send targeted emails, trigger automations, and track the performance of those segments over time.
Unlike custom fields — which store data about a contact — tags describe the relationship or status of a contact. A contact can hold unlimited tags, making it easy to build highly specific audiences based on multiple criteria simultaneously.
Common use cases for tags include identifying the role of a contact (such as “Account Manager”), marking the stage of a sales conversation, tracking event attendance, or categorizing contacts by product interest. Tags also work hand-in-hand with Keap’s automation builder, where applying or removing a tag can trigger an entire follow-up sequence.
Step 1: Set Up a New Tag in Keap Settings
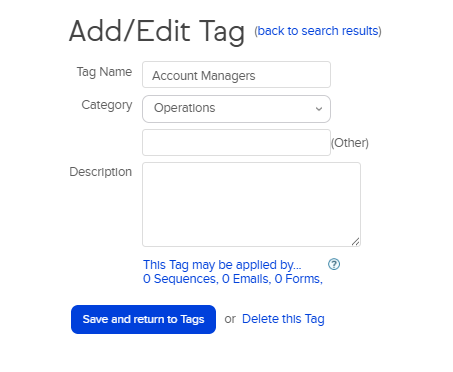
Tags in Keap are created and managed from the Settings section of the app. Here is how to set up a new tag from scratch:
- Click on the user avatar (profile icon) in the bottom-left corner of the screen.
- Select Settings from the menu.
- In the Settings menu, locate and click Tags.
- Click the Add Tag button.
- Enter a descriptive name for the tag (for example: “Account Manager”).
- Optionally, assign the tag to a Tag Category to keep things organized (more on this below).
- Add a brief description so team members understand the tag’s purpose.
- Click Save.
The tag now appears in the master tags list and is ready to be applied to any contact in the account.
Using Tag Categories to Stay Organized
As a Keap account grows, the number of tags can multiply quickly. Tag categories are folders that group related tags together, making them much easier to find when applying them to contacts or building automations.
To create a Tag Category before or during tag creation, click the Add Category option in the Tags settings screen. Give the category a clear name — such as “Team Roles,” “Lead Source,” or “Product Interest” — then assign new or existing tags to it.
For example, a tag like “Account Manager” fits naturally inside a “Team Roles” category, while “Webinar Attendee” would belong under an “Events” category. This structure keeps the tag list clean and makes it faster to apply the right tag from a contact record.
Step 2: Apply a Tag Manually to a Single Contact
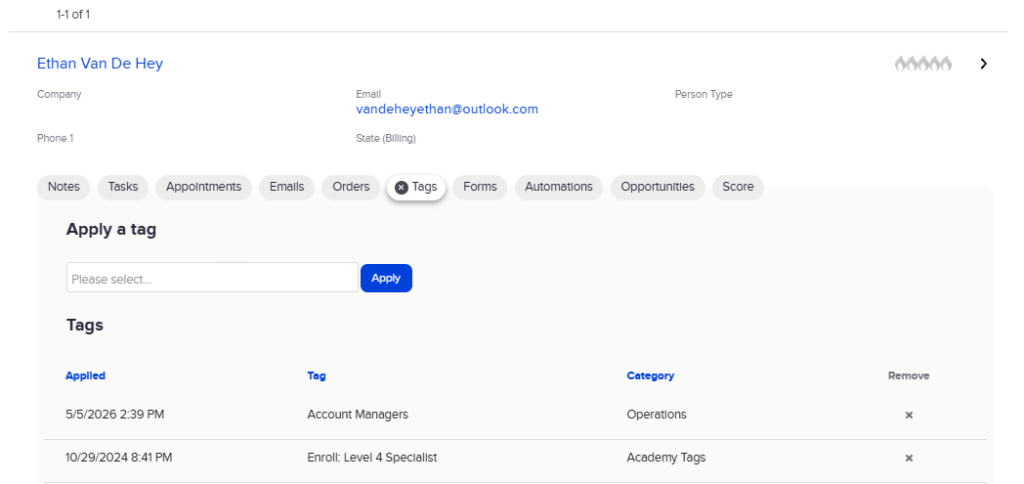
Once a tag exists in the system, applying it to an individual contact takes only a few clicks. This is the method to use when updating a single contact’s record directly — for instance, when assigning a specific role like “Account Manager” after reviewing an Operations Tracker.
- Navigate to Contacts > People from the left-hand navigation menu.
- Search for the contact by name or email and click on their record to open it.
- Inside the contact record, locate the Tags section (usually visible on the right side or within the contact details panel).
- Click the + Add Tag button or the tag input field.
- Type the tag name (e.g., “Account Manager”) or browse by category to locate it.
- Select the tag from the dropdown list that appears.
- The tag is applied immediately and shows up on the contact’s record with no need to save manually.
The activity feed on the contact record will log the tag application, including a timestamp. This gives the team a clear audit trail of when the tag was added and helps avoid duplicate actions.
Step 3: Apply Tags to Multiple Contacts at Once
When the same tag needs to go on a batch of contacts — for example, tagging everyone who attended a recent event — Keap allows bulk tag application directly from the Contacts list.
- Go to Contacts > People.
- Use the filter and search tools to find the group of contacts to tag. Alternatively, check the box next to individual contact names.
- Once contacts are selected, click the More Actions button (or the action dropdown that appears).
- Choose Add Tag from the available actions.
- Search for or select the tag to apply.
- Confirm the action. Keap will apply the tag to every selected contact.
The same menu also includes a Remove Tag option, making it straightforward to clean up outdated tags from a filtered list of contacts.
How Tags Connect to Keap Automations
Tags are not just labels — they are triggers. In Keap’s automation builder, applying a tag to a contact can instantly kick off a sequence of emails, tasks, or pipeline updates. This is what makes the tagging system so valuable for teams managing large contact databases.
For example, the moment a contact receives the “Account Manager” tag, an automation can fire off an internal notification to the relevant team member, schedule a follow-up task, or enroll the contact in a specific nurture sequence.
To connect a tag to an automation directly from the Settings screen, navigate to the tag in Settings > Tags, click on it, and look for the automation options available within the tag’s configuration panel. Keap provides example automation templates to get started quickly.
Best Practices for Tagging Contacts in Keap
A well-organized tag system makes everything in Keap faster and more reliable. Here are the practices that keep a tag library useful rather than cluttered:
- Use consistent naming conventions. Decide on a naming format (e.g., title case for roles, past tense for actions) and apply it to every tag. “Account Manager” and “account manager” will both appear in the system, creating confusion.
- Group tags into categories from the start. Setting up categories before creating dozens of tags saves significant time when building automations or filtered lists later.
- Add descriptions to every tag. A one-line description explaining when and why a tag is applied helps new team members use the system correctly without needing to ask.
- Audit tags periodically. Over time, tags become outdated. Schedule a quarterly review to merge duplicates, remove unused tags, and rename any that no longer match the current workflow.
- Avoid over-tagging. Applying too many tags to a single contact can make automations unpredictable. Tag for what matters and leave the rest to custom fields.
Tracking Tag Performance with Keap Reports
Keap Pro and Max users can use the Tag Tracker report to see how many contacts hold a given tag and match exported contact IDs to their applied tags. This is especially useful for tracking the performance of specific segments, such as measuring how contacts tagged as “Account Manager” respond to email campaigns compared to the broader list.
To access the Tag Tracker, navigate to Reports in the left-hand navigation and look for the report under the contact reporting section. This data helps the team refine its tagging strategy based on actual engagement, not guesswork.
Start Tagging Contacts the Right Way
Tags are the foundation of smart contact management in Keap. Setting them up properly — with clear names, logical categories, and well-defined descriptions — makes every other part of the platform work better, from automations to email broadcasts to sales pipeline management.
The next time a contact needs a new label, skip the manual workarounds. Set up the tag in Settings, apply it directly from the contact record, and let Keap handle the rest automatically.
Have questions about setting up your Keap tag system or need help connecting tags to your automation workflows? Reach out to the BlitzMetrics team — we’re happy to help you build a contact management system that actually scales.
Originally published .
Dennis Yu
Dennis Yu is the CEO of Local Service Spotlight, a platform that amplifies the reputations of contractors and local service businesses using the Content Factory process. He is a former search engine engineer who has spent a billion dollars on Google and Facebook ads for Nike, Quiznos, Ashley Furniture, Red Bull, State Farm, and other brands.
Dennis has achieved 25% of his goal of creating a million digital marketing jobs by partnering with universities, professional organizations, and agencies. Through Local Service Spotlight, he teaches the Dollar a Day strategy and Content Factory training to help local service businesses enhance their existing local reputation and make the phone ring.
Dennis coaches young adult agency owners serving plumbers, AC technicians, landscapers, roofers, electricians, and believes there should be a standard in measuring local marketing efforts, much like doctors and plumbers must be certified. He has appeared on 353 podcasts with 619 credited episodes — see the full list of his podcast appearances.