How to Create a Google Ads Account in 5 Simple Steps
Google Ads is Google's platform for running ads on Search, YouTube, and websites across the Display Network.
For local business owners, it’s one of the most effective ways to get in front of people searching for your services. You control your budget, target by zip code, and see which ads bring in calls and clicks.
Google Ads lets you reach people exactly when they’re looking for what you offer. It’s flexible, measurable, and designed to get local results, whether that’s phone calls, form submissions, or visits to your location.
If you're considering Google Local Service Ads (LSAs) or already running them for your business, you're on the right track. LSAs rank above traditional Google Ads and deliver excellent returns for local businesses.
To get the most out of LSAs, you also need a properly set up Google Ads account.
Google Ads gives you access to advanced tracking, remarketing, and audience targeting tools that LSAs alone don’t offer. When paired with LSAs, it helps you retarget missed leads, optimize conversions, and prepare for scaling into full PPC campaigns.
Google Ads is one of the key components of the Access Checklist, which outlines all platforms and permissions required to set up your digital presence.
This guide walks beginners, clients, and specialists through every step so you get it right the first time.
Task Checklist
Information that you will need:
- Your Gmail account credentials (ideally the same one used for Google Analytics or Tag Manager).
- Your business's correct billing country, currency, and time zone settings.
Tools that you will need:
- A modern desktop browser such as Chrome, Firefox, or Edge.
Steps:
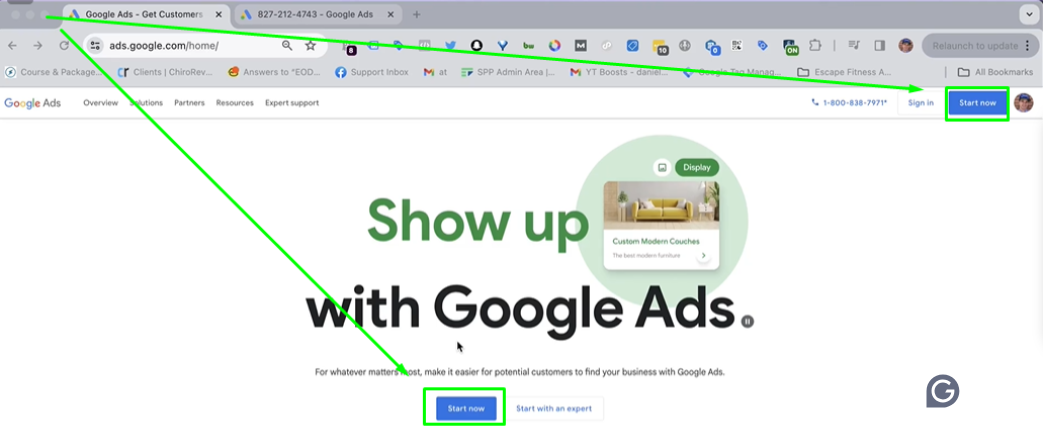
- Go to https://ads.google.com and click “Start now.”
- Log in using your Google account.
- Select “Skip campaign creation”.
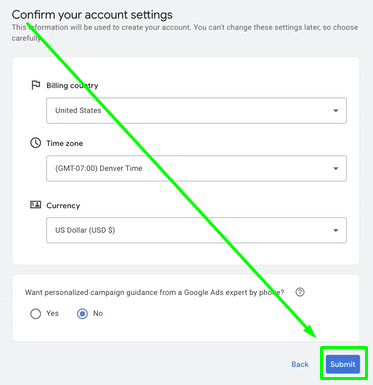
- Choose your billing country, time zone, and currency.
- Click “Submit” to complete your account setup.
Estimated Time to Complete: 2 to 5 minutes.
Step 2: Log in using your Google account.
Pro Tip: Use the same email you use for other Google tools.

Step 3: Select “Create your first campaign.”
You can create campaigns later if needed.

Step 4: Choose your billing country, time zone, and currency.

Step 5: Click “Submit” to complete your account setup.
Final Result
You’ll land in your Google Ads dashboard. You can find your Customer ID in the top right corner.
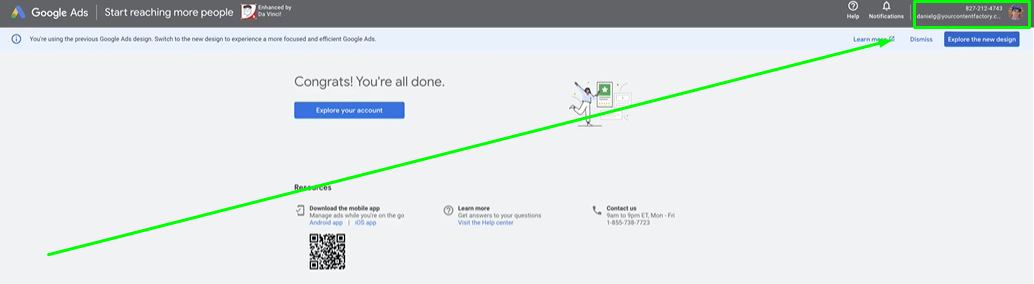
That's it. You're done. Good job!
Verification Checklist
#1. You used the correct Google account.
#2. You skipped the campaign setup step.
#3. You selected the correct billing preferences.
#4. You completed the account creation process.
#5. You located your Customer ID.