by /
Note (Updated March 2026): This guide covers the GoDaddy-specific steps for updating nameservers. If you are setting up a new personal brand website through our platform, start with the full guide: How to Spin Up a New Personal Brand Website Using BlitzAdmin, which covers creating the site and generating the nameservers before you come here to update GoDaddy. The nameservers you need to enter come from the BlitzAdmin site creation confirmation dialog — each site gets its own unique set of four AWS nameservers.
Updated GoDaddy Navigation (2026): GoDaddy has updated their interface. You can now go directly to dcc.godaddy.com, select your domain, and click the “Nameservers” tab at the top of the DNS Management page. Then click “Change Nameservers” to proceed with the steps below.
Step-by-Step Tutorial: How to Modify Domain DNS Nameservers in GoDaddy

Table of Contents
You’ll be providing that list of nameservers to the domain registrar/DNS host. These instructions are for GoDaddy but will be roughly similar for other registrars and DNS hosts.
Sign in to GoDaddy
Sign in to GoDaddy. Navigate to ‘Manage My Products” → “Domains”. Select the domain you already submitted via the site builder. This will take you to the “Domain Information” screen.
Beside the “Overview” tab, click the “DNS” button
Beside the “Overview” tab, click the “DNS” button. (See Screenshot.)
On the “Manage DNS” screen, click the “Change Nameservers”
On the “Manage DNS” screen, click the “Change Nameservers” button.

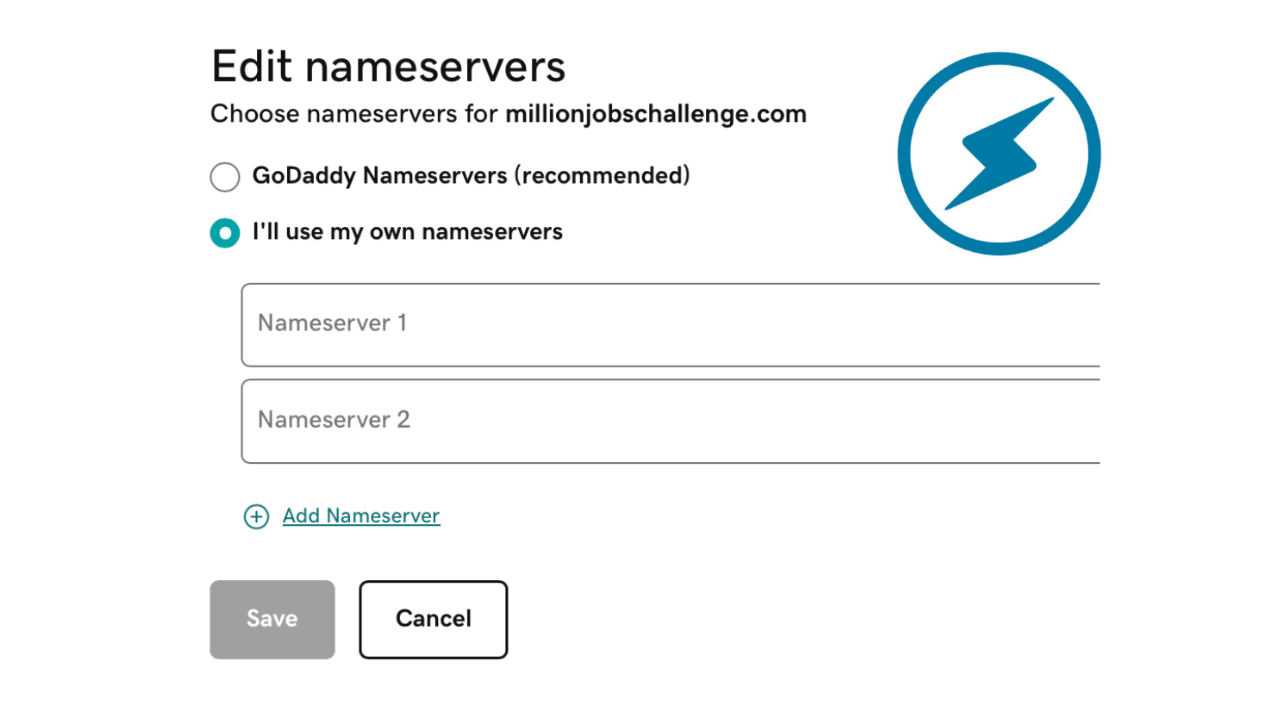
On the “Change Nameservers” dialog, choose to “I’ll use my own nameservers”
On the “Change Nameservers” dialog, choose to “I’ll use my own nameservers”

Enter the Nameservers you need to enter
Enter the nameservers you need to enter. Nameservers could be 2, 4, or more

Click “Save”
Click “Save” If you encounter a confirmation popup for nameserver changes, click the checkbox and “Continue.”

Troubleshooting
If the site does not load after updating nameservers, check these common issues. DNS propagation can take anywhere from 15 minutes to 24 hours, so wait at least an hour before troubleshooting. You can check propagation status at dns.google by looking up your domain’s A record — it should return 34.199.192.119 once propagation is complete.
If the site shows a 500 Internal Server Error, the domain may still be pointing to an old server (such as a Google Cloud IP from a former Google Domains registration). Verify the nameservers are set to the four AWS nameservers from BlitzAdmin, not the old defaults. If the site shows a GoDaddy parking page, the nameserver change has not propagated yet — wait longer or clear your browser cache and try again.
Verification Checklist
After updating the nameservers, verify the following before marking the DNS step complete:
#1. GoDaddy shows “Using custom nameservers” on the Nameservers tab (not the default ns*.domaincontrol.com nameservers).
#2. All four AWS nameservers from BlitzAdmin are listed correctly — no typos, no missing entries.
#3. The domain resolves at dns.google and returns the correct A record (34.199.192.119).
#4. The site loads in a browser and shows either a fresh WordPress installation or the BlitzMetrics Personal Branding template.
#5. The site loads over HTTPS with a valid SSL certificate (padlock icon visible). This happens automatically via Caddy once DNS is configured — no manual SSL setup needed.
Where This Fits in the Pipeline
This GoDaddy nameserver guide is a supporting step within the larger personal brand website provisioning process. You should only be following this guide after you have already created the site in BlitzAdmin and received the four AWS nameservers. Here is how this step connects to the rest of the pipeline:
- How to Spin Up a New Personal Brand Website Using BlitzAdmin — the parent guide that covers the full end-to-end process including site creation, DNS configuration, template installation, and content population. Start here if you have not yet created the site.
- Personal Branding — the definitive article on building authority and earning a Knowledge Panel for an individual. Every GoDaddy domain we configure through this process is part of a personal brand website.
- Digital Plumbing — the technical foundation that gets installed after DNS is configured. Once the nameservers are pointed and the site is live, Digital Plumbing covers the next layer of technical setup (analytics, tracking, schema).
- How to Document a Task — the standard we follow for creating step-by-step guides like this one.
This guide is listed in the BlitzMetrics Task Library as a supporting task under Website Building and QA. For more documented tasks and processes, browse the full Task Library.

Dennis Yu
Dennis Yu is the CEO of Local Service Spotlight, a platform that amplifies the reputations of contractors and local service businesses using the Content Factory process. He is a former search engine engineer who has spent a billion dollars on Google and Facebook ads for Nike, Quiznos, Ashley Furniture, Red Bull, State Farm, and other brands.
Dennis has achieved 25% of his goal of creating a million digital marketing jobs by partnering with universities, professional organizations, and agencies. Through Local Service Spotlight, he teaches the Dollar a Day strategy and Content Factory training to help local service businesses enhance their existing local reputation and make the phone ring.
Dennis coaches young adult agency owners serving plumbers, AC technicians, landscapers, roofers, electricians, and believes there should be a standard in measuring local marketing efforts, much like doctors and plumbers must be certified.