
What is Digital Plumbing?
Digital plumbing is not only tracking on a website; it’s all your data across all your channels. Not just pixels, but emails, custom audiences of all sorts, URL
parameters, and so forth.
Tracking allows for remarketing to website visitors. Analyze which website
visitors are buyers, build custom audiences, and run warm traffic through the
6 Phase Social Amplification Engine to convert.
The plumbing setup uses a central tool called Google Tag Manager (GTM).
Although it’s from Google, it is platform independent and works with
Facebook and other pixels (or tags). Tag management is a central piece of
every company or website’s online marketing.
The tool is used to easily manage all tracking pixels on a website (Facebook,
Google Ads, Google Analytics, Yahoo!, etc.). GTM uses one container (=source
code) on a website. The container then loads tags (=other code) based on
triggers we define. Here is a brief intro to the Tag Manager by Google.
By setting up and installing GTM, we set the stage to create powerful
marketing campaigns inside of Facebook and Google Ads. This speeds up the
process of building marketing campaigns and reduces cost by eliminating
the need to hire a developer to modify site code.
Plumbing also includes your email list, your social audiences, your app
audiences, and any other data you have that we can tie together. With strong
plumbing, we can push audiences between different channels to increase
conversion rates.
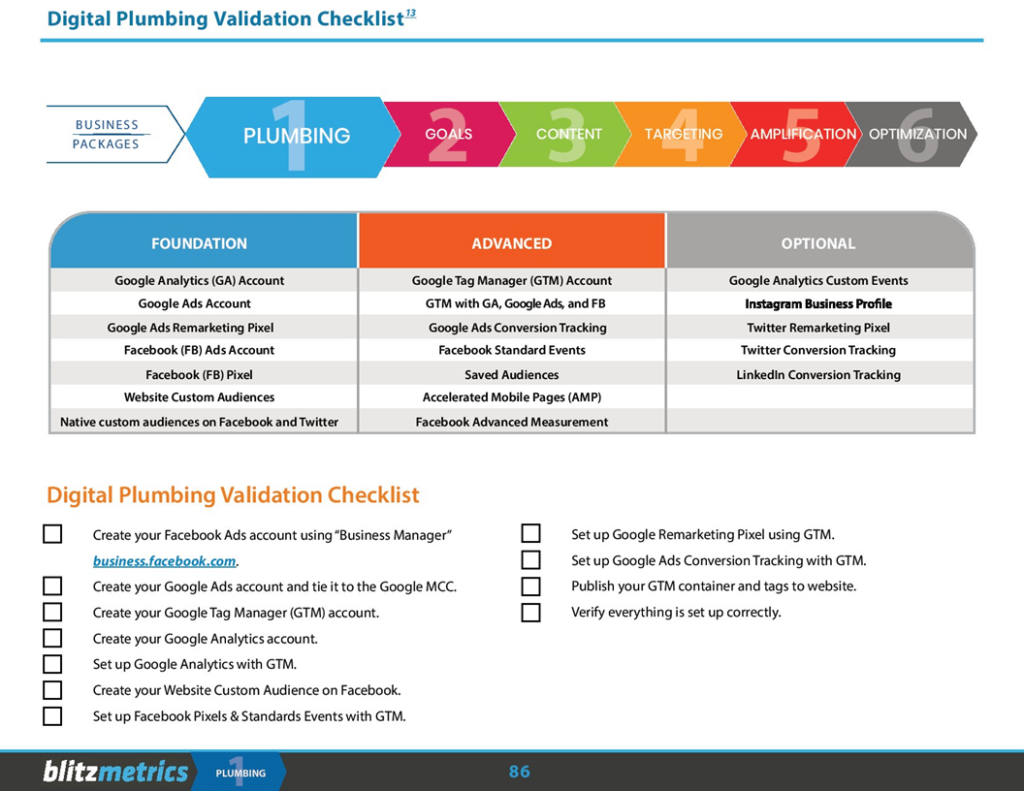
Digital Plumbing Validation Checklist
☐ Create your Facebook Ads account using “Business Manager”
business.facebook.com.
☐ Create your Google Ads account and tie it to the Google MCC.
☐ Create your Google Tag Manager (GTM) account.
☐ Create your Google Analytics account.
☐ Set up Google Analytics with GTM.
☐ Create your Website Custom Audience on Facebook.
☐ Set up Facebook Pixels & Standards Events with GTM.
☐ Set up Google Remarketing Pixel using GTM.
☐ Set up Google Ads Conversion Tracking with GTM.
☐ Publish your GTM container and tags to website
Digital Plumbing – Overview
(text only)
01 – Preparation
Steps 1-4 take 3 minutes
- Open a new tab and log in to https://tagmanager.google.com (GTM).
- Open a new tab and log in to https://analytics.google.com (GA).
- Open a new tab and log in to https://ads.google.com (Google Ads).
- Open a new tab and log in with your personal Facebook account at business.facebook.com.
02 – Google Analytics Setup for GTM
Steps 1-3 take 6 minutes
- Go to Google Analytics and click Admin in the bottom-left corner. Click on the Tracking Info section and then on Tracking Code. Copy your Google Analytics Tracking ID.
- Go to GTM and select the container of the appropriate account. Select the Variables link in the left sidebar, and then click on New to create a new User-Defined Variable. Click on “Untitled Variable” and name it “GA Settings”. Click on the Variable Configuration section and scroll down to select Google Analytics Settings. Paste your Analytics Tracking ID from Step 1. Click on More Settings, Advertising, and click the check-box to Enable Display Advertising Features. Click Save.
- Select the Tags link in the left sidebar, and then click on New Tag to create a new tag. Edit name to GA – All Visitors, and click on the Tag Configuration section. Select Universal Analytics row. Select {{GA Settings}} from the Google Analytics Settings dropdown menu. Scroll down to the Triggering section, and click to choose a trigger. Click on the All Pages row. Click on Save. The Google Analytics setup is complete.
03 – Facebook Custom Audience and Pixel Setup for GTM
Steps 1-4 take 13 minutes
- In Facebook Ads Manager, click on Menu, then hover over All Tools >, and then select Audiences (in upper navigation bar under Assets). Click Create Audience and then Custom Audience. Select Website Traffic to build an audience from your website visitors. Set up audience for 7, 30, or 180 days (repeat to accomplish this). Use the “WCA – All Visitors – xx Days ” formatting to indicate Website Custom Audience visitors with the designated time period.
- Click on Menu, then hover over All Tools >, and select Pixels under Measure & Report. (Skip to step 8 if Pixel has been set up previously). Click on the Create a Pixel button. Verify the Pixel Name, and click Next. After viewing the verification screen, select Use an Integration or Tag Manager. Skip to Step 4.
- Click Set-up. Click on Use an Integration or Tag Manager.
- Select Google Tag Manager. Click Continue. Select the Google Account your Tag Manager is linked to. Select the Account and Container you are working in and click Finish Setup. Close the install window and click on Settings. Then click on the toggle switch to activate Automatic Advanced Matching. Your Facebook Pixel is now set up to fire on all pages of your website. You also have your remarketing audiences set up to retarget your website visitors.

Google Ads Remarketing Setup for GTM
Steps 1-7 take 18 minutes
☐ 1. Inside Google Ads, click on the Tools icon then Audience Manager.
If remarketing tag has been set up previously, skip to Step 3.
Note: if campaigns haven’t been previously set up, then an intro
campaign will need to be set up before viewing the screen with the
Shared Library option.
Click on Set Up An Audience Source. Click on Set Up Tag.
☐ 2. Select Collect standard data available from this data source and
check the box next to “user_id”. Click Save and Continue.
Scroll down and click Use Tag Manager. Copy your Conversion ID.
Skip to Step 4.
☐ 3. Click on Audience Source. Click on Details. Scroll down and expand
the Tag Setup section. Scroll further down the page and select Use
Tag Manager. Copy the Conversion ID.
☐ 4. Go to GTM, select the Variables link in the left sidebar, and then click
on New to create a new User-Defined Variable. Click on the “Untitled
Variable” text, and name the variable “G-ads_conversion_id”.
Click in the Variable Configuration section, and select Constant
variable. Paste the Conversion ID into the Value field, and then click
on Save.
☐ 5. Select the Tags link in the left sidebar, and then click on the red New
button to create a new tag. Edit the name to “Google Ads – All
Visitors”, and then click on the Tag Configuration section.
Click on the Google Ads Remarketing row. Click on the Choose
Variable icon. Select the G-Ads_conversion_id variable row.
6. Scroll down to the Triggering section, and click to choose a trigger.
Click on the All Pages row. Click on Save, the Google Ads
Remarketing setup is complete.
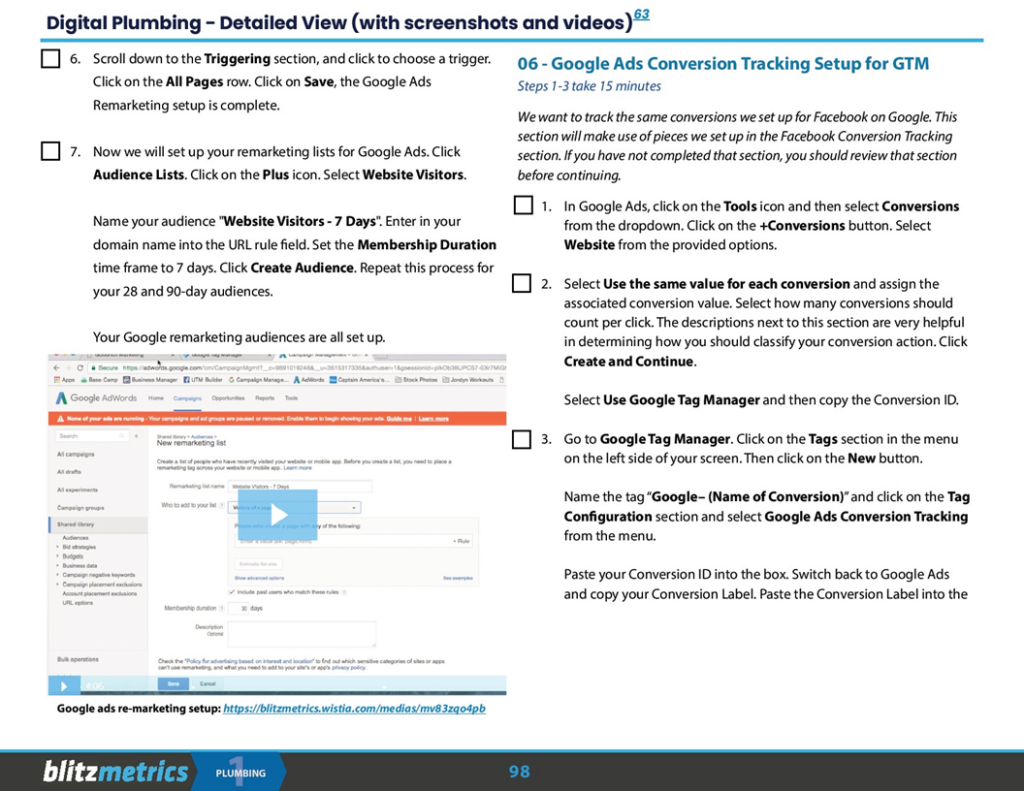
☐ 7. Now we will set up your remarketing lists for Google Ads. Click
Audience Lists. Click on the Plus icon. Select Website Visitors.
Name your audience “Website Visitors – 7 Days”. Enter your
domain name into the URL rule field. Set the Membership Duration
time frame to 7 days. Click Create Audience. Repeat this process for
your 28 and 90-day audiences.
Your Google remarketing audiences are all set up.
– Google Ads Conversion Tracking Setup for GTM
Steps 1-3 take 15 minutes
We want to track the same conversions we set up for Facebook on Google. This
section will make use of pieces we set up in the Facebook Conversion Tracking
section. If you have not completed that section, you should review that section
before continuing.
☐ 1. In Google Ads, click on the Tools icon and then select Conversions
from the dropdown. Click on the +Conversions button. Select
Website from the provided options.
☐ 2. Select Use the same value for each conversion and assign the
associated conversion value. Select how many conversions should
count per click. The descriptions next to this section are very helpful
in determining how you should classify your conversion action. Click
Create and Continue.
Select Use Google Tag Manager and then copy the Conversion ID.
☐ 3. Go to Google Tag Manager. Click on the Tags section in the menu
on the left side of your screen. Then click on the New button.
Name the tag “Google– (Name of Conversion)” and click on the Tag
Configuration section. Select Google Ads Conversion Tracking
from the menu.
Paste your Conversion ID into the box. Switch back to Google Ads
and copy your Conversion Label. Paste the Conversion Label into the
corresponding box in Google Tag Manager.
Scroll down and click on the Triggering section. Select the
corresponding trigger you set up for your Facebook Conversion
tracking. Repeat these steps for all of the conversions you set up for
Facebook.
07 – Publish GTM Container and Tags to Website
Step takes 1 minute
☐ 1. In GTM, click on the red Publish button (in the top-right corner).
Click and set the version Name and Description of changes to be
published. Click on the red Publish button.
If you have not already implemented your Google Tag Manager
container onto your website, you will need to do so now. If you
are using a WordPress site, we recommend using this plugin.
All you will need to do is copy your Container ID and paste it into the
settings of the plugin. You can find your Container ID (GTM-XXXXXXX)
in the top-right corner of the screen.
If you are using a custom HTML site, click on the Container ID and
follow the instructions.
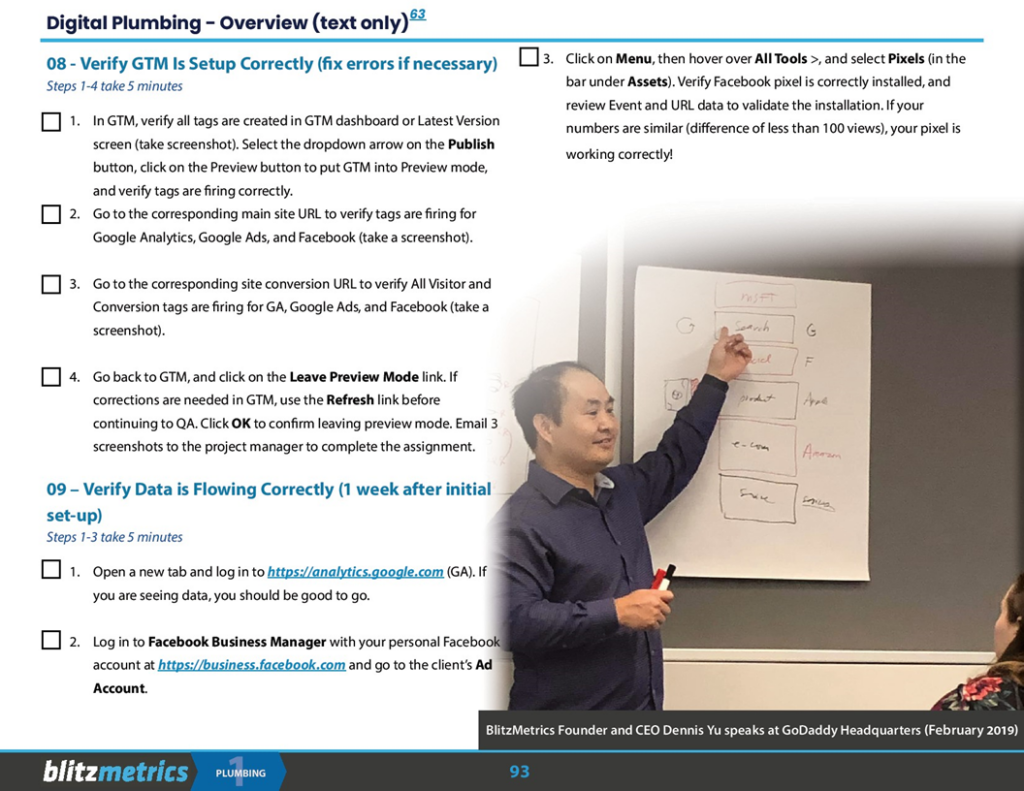
Verify GTM Is Setup Correctly (fix errors if necessary)
Steps 1-4 take 5 minutes
☐ 1. In GTM, verify all tags are created in GTM dashboard or Latest Version
screen (take screenshot). Select the dropdown arrow on the Publish
button, click on the Preview button to put GTM into Preview mode,
and verify tags are firing correctly.
☐ 2. Go to the corresponding main site URL to verify tags are firing for
Google Analytics, Google Ads, and Facebook (take a screenshot).
☐ 3. Go to the corresponding site conversion URL to verify All Visitor and
Conversion tags are firing for GA, Google Ads, and Facebook (take a
screenshot).
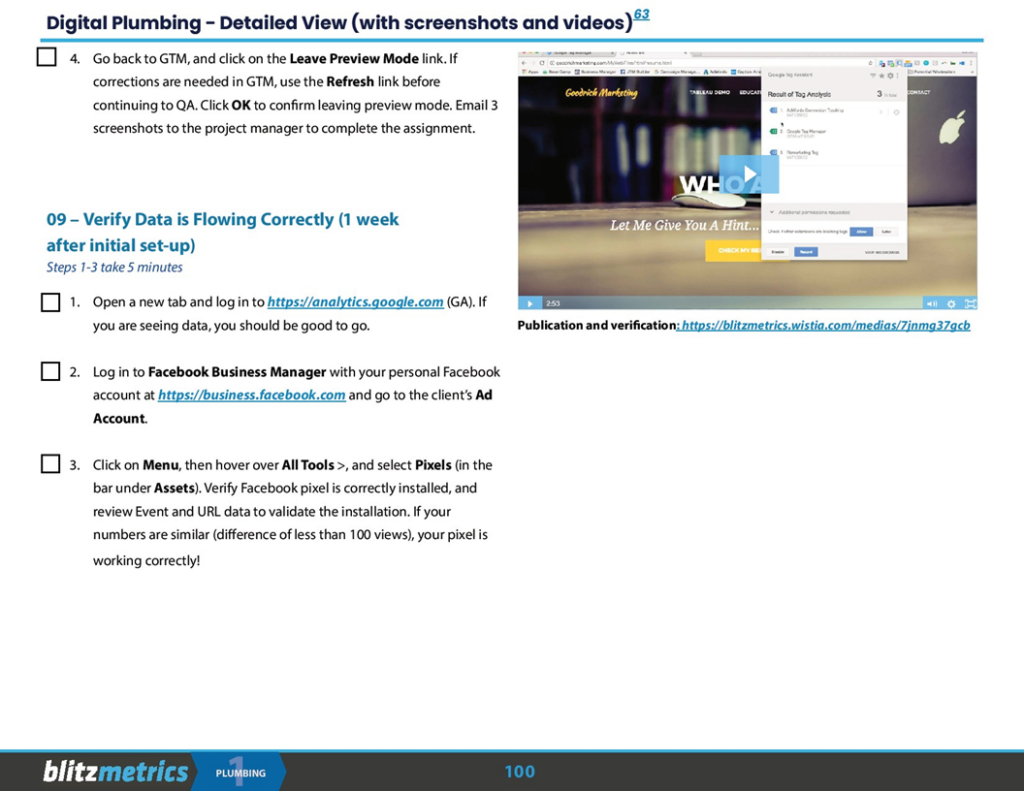
☐ 4. Go back to GTM, and click on the Leave Preview Mode link. If
corrections are needed in GTM, use the Refresh link before
continuing to QA. Click OK to confirm leaving preview mode. Email 3
screenshots to the project manager to complete the assignment.
09 – Verify Data is Flowing Correctly (1 week after initial set-up)
Steps 1-3 take 5 minutes
☐ 1. Open a new tab and log in to https://analytics.google.com (GA). If
you are seeing data, you should be good to go.
☐ 2. Log in to Facebook Business Manager with your personal Facebook
account at https://business.facebook.com and go to the client’s Ad
Account.
☐ 3. Click on Menu, then hover over All Tools >, and select Pixels (in the
bar under Assets). Verify Facebook pixel is correctly installed, and
review Event and URL data to validate the installation. If your
numbers are similar (difference of less than 100 views), your pixel is
working correctly!
Here is your updated text with bolded headings, the numbering unchanged, and the font preserved:
01 – Preparation
Steps 1-5 take 3 minutes
☐ 1. Open a new tab and log in to https://tagmanager.google.com (GTM).
☐ 2. Open a new tab and log in to https://analytics.google.com (GA).
☐ 3. Open a new tab and log in to https://ads.google.com (Google Ads).
☐ 4. Open a new tab and log in with your personal Facebook account at
https://business.facebook.com and go to the client’s Ad Account.
☐ 5. Verify you have access to the Business Manager in Facebook, and click
into Business Manager.
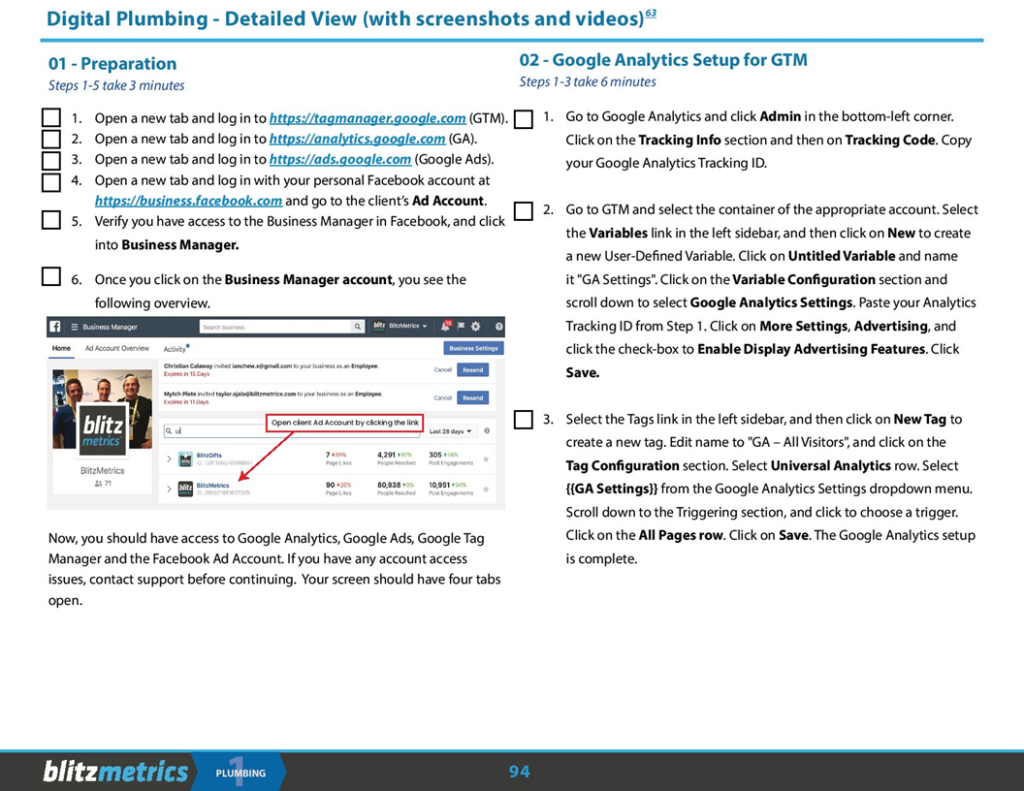
☐ 6. Once you click on the Business Manager account, you see the
overview as shown.
Now, you should have access to Google Analytics, Google Ads, Google Tag
Manager and the Facebook Ad Account. If you have any account access
issues, contact support before continuing. Your screen should have four tabs
open.
02 – Google Analytics Setup for GTM
Steps 1-3 take 6 minutes
☐ 1. Go to Google Analytics and click Admin in the bottom-left corner.
Click on the Tracking Info section and then on Tracking Code. Copy
your Google Analytics Tracking ID.
☐ 2. Go to GTM and select the container of the appropriate account. Select
the Variables link in the left sidebar, and then click on New to create
a new User-Defined Variable. Click on Untitled Variable and name
it “GA Settings”. Click on the Variable Configuration section and
scroll down to select Google Analytics Settings. Paste your Analytics
Tracking ID from Step 1. Click on More Settings, Advertising, and
click the check-box to Enable Display Advertising Features. Click
Save.
3. Select the Tags link in the left sidebar, and then click on New Tag to
create a new tag. Edit name to “GA – All Visitors”, and click on the
Tag Configuration section. Select Universal Analytics row. Select
{{GA Settings}} from the Google Analytics Settings dropdown menu.
Scroll down to the Triggering section, and click to choose a trigger.
Click on the All Pages row. Click on Save. The Google Analytics setup
is complete.
03 – Facebook Custom Audience and Pixel Setup for GTM
Steps 1-4 take 13 minutes
☐ 1. In Facebook Ads Manager, click on Menu, then hover over All Tools
, and then select Audiences (in upper navigation bar under Assets).
Click Create Audience and then Custom Audience. Select Website
Traffic to build an audience from your website visitors. Set up
audience for 7, 30, or 180 days (repeat to accomplish this). Use the
“WCA – All Visitors – xx Days” formatting to indicate Website
Custom Audience visitors with the designated time-period.
☐ 2. Click on Menu, then hover over All Tools >, and select Pixels under
Measure & Report. (Skip to step 8 if Pixel has been set up
previously). Click on the Create a Pixel button. Verify the Pixel
Name, and click Next. After viewing the verification screen, select
Use an Integration or Tag Manager. Skip to Step 4.
☐ 3. Click Set-up. Click on Use an Integration or Tag Manager.
☐ 4. Select Google Tag Manager. Click Continue. Select the Google
Account your Tag Manager is linked to. Select the Account and
Container you are working in and click Finish Setup. Close the
install window and click on Settings. Then click on the toggle switch
to activate Automatic Advanced Matching. Your Facebook Pixel is
now set up to fire on all pages of your website. You also have your
remarketing audiences set-up to retarget your website visitors.
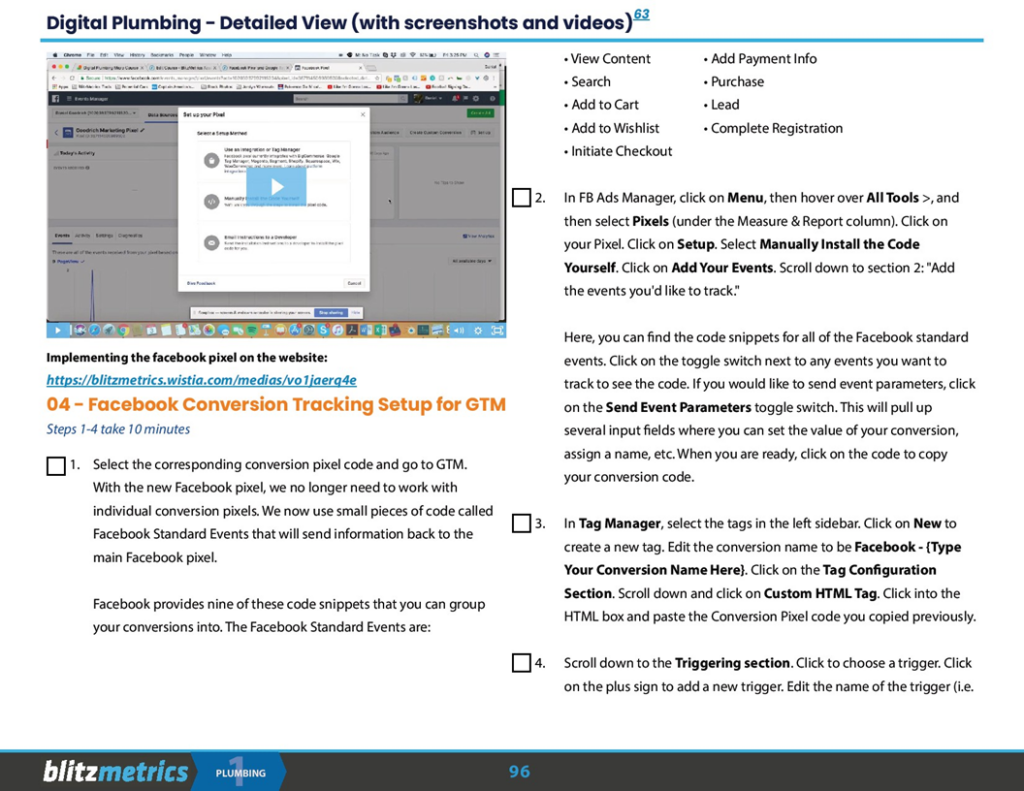
Implementing the Facebook Pixel on the Website:
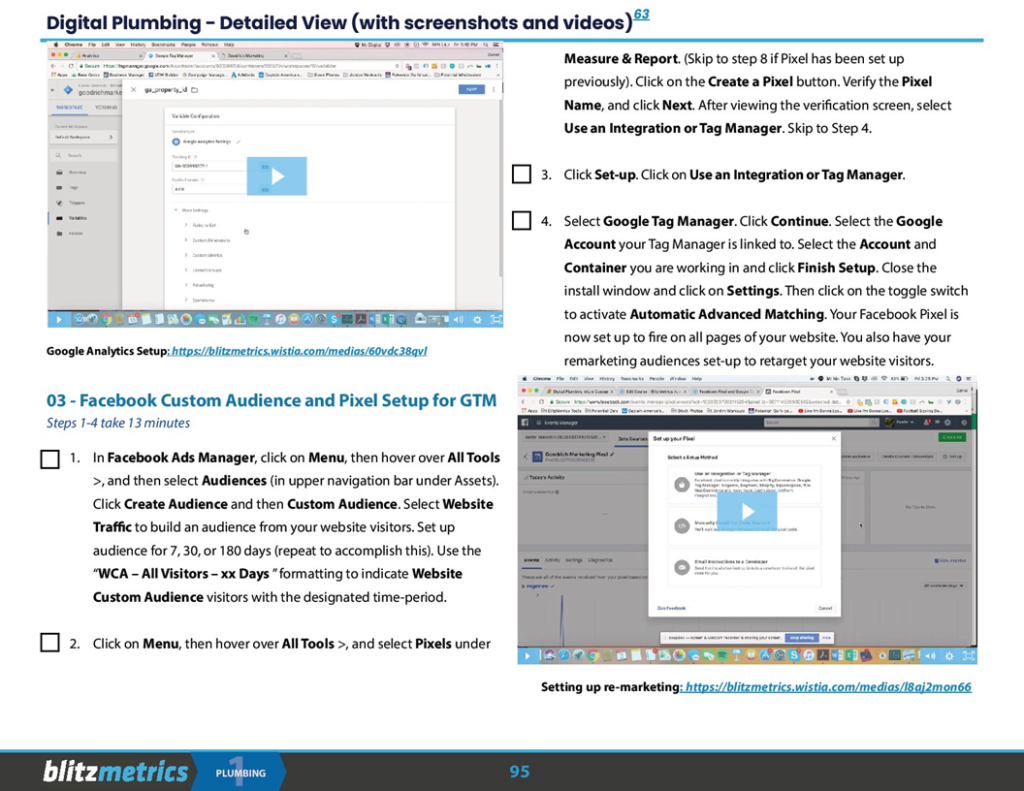
https://blitzmetrics.wistia.com/medias/vo1jaerq4e
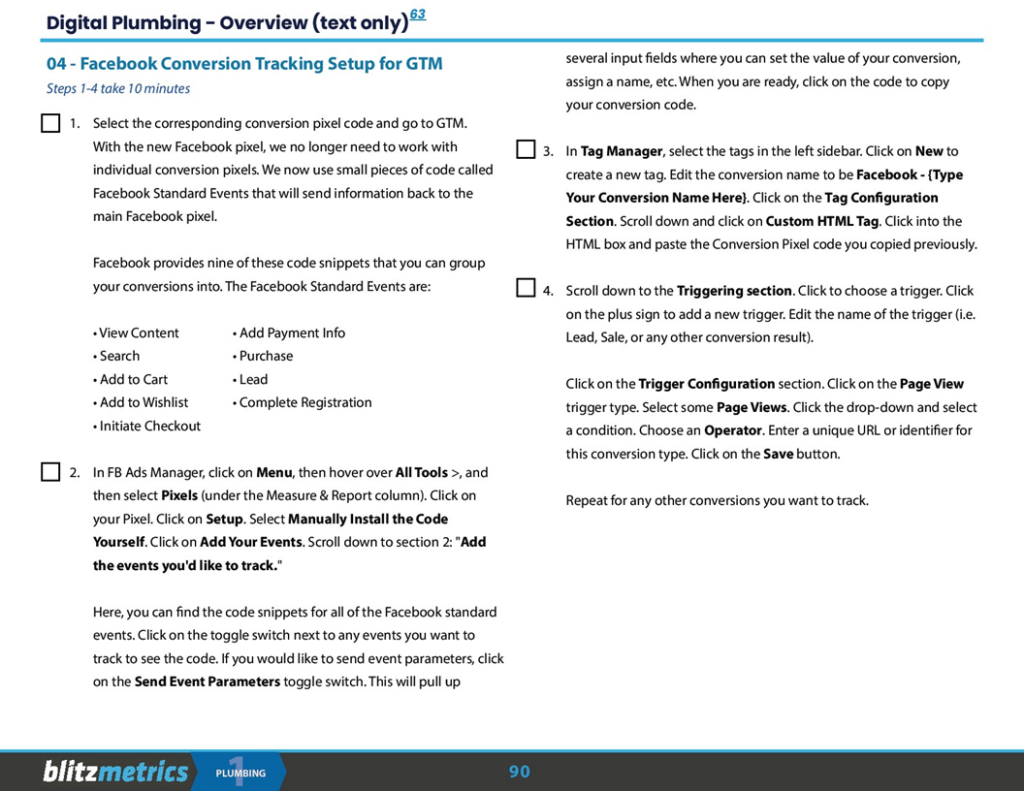
04 – Facebook Conversion Tracking Setup for GTM
Steps 1-4 take 10 minutes
☐ 1. Select the corresponding conversion pixel code and go to GTM.
With the new Facebook pixel, we no longer need to work with
individual conversion pixels. We now use small pieces of code called
Facebook Standard Events that will send information back to the
main Facebook pixel.
Facebook provides nine of these code snippets that you can group
your conversions into. The Facebook Standard Events are:
• View Content • Add Payment Info
• Search • Purchase
• Add to Cart • Lead
• Add to Wishlist • Complete Registration
• Initiate Checkout
☐ 2. In FB Ads Manager, click on Menu, then hover over All Tools >, and
then select Pixels (under the Measure & Report column). Click on
your Pixel. Click on Setup. Select Manually Install the Code
Yourself. Click on Add Your Events. Scroll down to section 2: “Add
the events you’d like to track.”
Here, you can find the code snippets for all of the Facebook standard
events. Click on the toggle switch next to any events you want to
track to see the code. If you would like to send event parameters, click
on the Send Event Parameters toggle switch. This will pull up
several input fields where you can set the value of your conversion,
assign a name, etc. When you are ready, click on the code to copy
your conversion code.
☐ 3. In Tag Manager, select the tags in the left sidebar. Click on New to
create a new tag. Edit the conversion name to be Facebook – {Type
Your Conversion Name Here}. Click on the Tag Configuration
Section. Scroll down and click on Custom HTML Tag. Click into the
HTML box and paste the Conversion Pixel code you copied previously.
☐ 4. Scroll down to the Triggering section. Click to choose a trigger. Click
on the plus sign to add a new trigger. Edit the name of the trigger (i.e.
Lead, Sale, or any other conversion result.
Click on the Trigger Configuration section. Click on the Page View
trigger type. Select some Page Views. Click the drop-down and select
a condition. Choose an Operator. Enter a unique URL or identifier for
this conversion type. Click on the Save button.
Repeat for any other conversions you want to track.
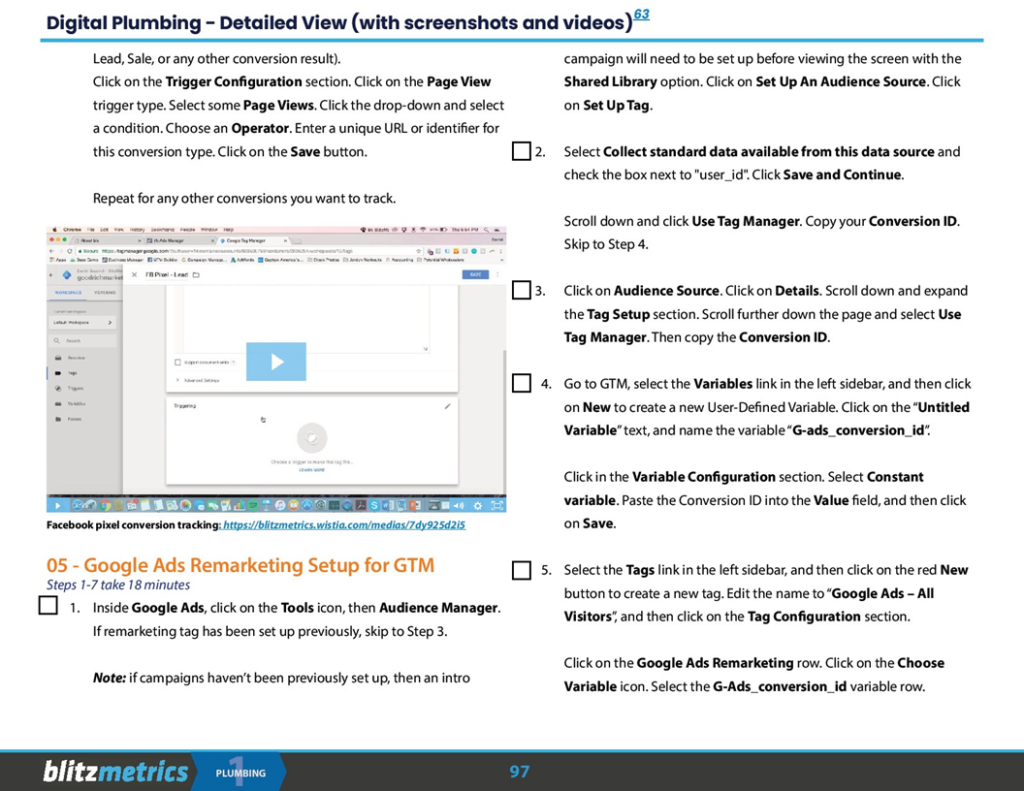
Facebook pixel conversion tracking: https://blitzmetrics.wistia.com/medias/7dy925d2i5
05 – Google Ads Remarketing Setup for GTM
Steps 1-7 take 18 minutes
☐ 1. Inside Google Ads, click on the Tools icon, then Audience Manager.
If remarketing tag has been set up previously, skip to Step 3.
Note: if campaigns haven’t been previously set up, then an intro
campaign will need to be set up before viewing the screen with the
Shared Library option. Click on Set Up An Audience Source. Click
on Set Up Tag.
☐ 2. Select Collect standard data available from this data source and
check the box next to “user_id”. Click Save and Continue.
Scroll down and click Use Tag Manager. Copy your Conversion ID.
Skip to Step 4.
☐ 3. Click on Audience Source. Click on Details. Scroll down and expand
the Tag Setup section. Scroll further down the page and select Use
Tag Manager. Then copy the Conversion ID.
☐ 4. Go to GTM, select the Variables link in the left sidebar, and then click
on New to create a new User-Defined Variable. Click on the “Untitled
Variable” text, and name the variable “G-ads_conversion_id”.
Click in the Variable Configuration section. Select Constant
variable. Paste the Conversion ID into the Value field, and then click
on Save.
☐ 5. Select the Tags link in the left sidebar, and then click on the red New
button to create a new tag. Edit the name to “Google Ads – All
Visitors”, and then click on the Tag Configuration section.
Click on the Google Ads Remarketing row. Click on the Choose
Variable icon. Select the G-Ads_conversion_id variable row.
☐ 6. Scroll down to the Triggering section, and click to choose a trigger.
Click on the All Pages row. Click on Save, the Google Ads Remarketing setup is complete.
☐ 7. Now we will set up your remarketing lists for Google Ads. Click
Audience Lists. Click on the Plus icon. Select Website Visitors.
Name your audience “Website Visitors – 7 Days”. Enter your
domain name into the URL rule field. Set the Membership Duration
time frame to 7 days. Click Create Audience. Repeat this process for
your 28 and 90-day audiences.
Your Google remarketing audiences are all set up.
☐
06 – Google Ads Conversion Tracking Setup for GTM
Steps 1-3 take 15 minutes
We want to track the same conversions we set up for Facebook on Google. This
section will make use of pieces we set up in the Facebook Conversion Tracking
section. If you have not completed that section, you should review that section
before continuing.
☐ 1. In Google Ads, click on the Tools icon and then select Conversions
from the dropdown. Click on the +Conversions button. Select
Website from the provided options.
☐ 2. Select Use the same value for each conversion and assign the
associated conversion value. Select how many conversions should
count per click. The descriptions next to this section are very helpful
in determining how you should classify your conversion action. Click
Create and Continue.
Select Use Google Tag Manager and then copy the Conversion ID.
☐ 3. Go to Google Tag Manager. Click on the Tags section in the menu
on the left side of your screen. Then click on the New button.
Name the tag “Google– (Name of Conversion)” and click on the Tag
Configuration section and select Google Ads Conversion Tracking
from the menu.
Paste your Conversion ID into the box. Switch back to Google Ads
and copy your Conversion Label. Paste the Conversion Label into the
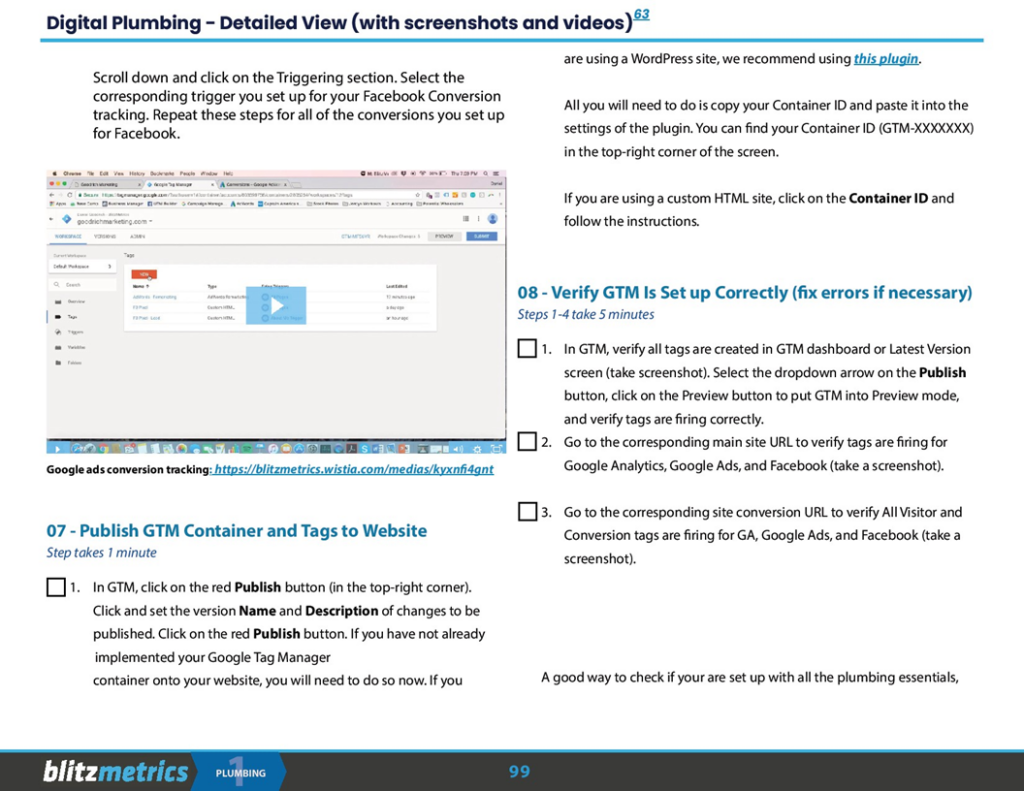
Scroll down and click on the Triggering section. Select the
corresponding trigger you set up for your Facebook Conversion
tracking. Repeat these steps for all of the conversions you set up
for Facebook.
Google ads conversion tracking: https://blitzmetrics.wistia.com/medias/kyxnfi4gnt
☐
07 – Publish GTM Container and Tags to Website
Step takes 1 minute
☐ 1. In GTM, click on the red Publish button (in the top-right corner).
Click and set the version Name and Description of changes to be
published. Click on the red Publish button.
If you have not already implemented your Google Tag Manager
container onto your website, you will need to do so now.
If you are using a WordPress site, we recommend using this plugin.
All you will need to do is copy your Container ID and paste it into the
settings of the plugin. You can find your Container ID (GTM-XXXXXXX)
in the top-right corner of the screen.
If you are using a custom HTML site, click on the Container ID and
follow the instructions.
08 – Verify GTM Is Set up Correctly (fix errors if necessary)
Steps 1-4 take 5 minutes
☐ 1. In GTM, verify all tags are created in GTM dashboard or Latest Version
screen (take a screenshot). Select the dropdown arrow on the Publish
button, click on the Preview button to put GTM into Preview mode,
and verify tags are firing correctly.
☐ 2. Go to the corresponding main site URL to verify tags are firing for
Google Analytics, Google Ads, and Facebook (take a screenshot).
☐ 3. Go to the corresponding site conversion URL to verify All Visitor and
Conversion tags are firing for GA, Google Ads, and Facebook (take a
screenshot).
Go back to GTM, and click on the Leave Preview Mode link. If
corrections are needed in GTM, use the Refresh link before
continuing to QA. Click OK to confirm leaving preview mode. Email 3
screenshots to the project manager to complete the assignment.
09 – Verify Data is Flowing Correctly (1 week
after initial set-up)
Steps 1-3 take 5 minutes
☐ 1. Open a new tab and log in to https://analytics.google.com (GA). If
you are seeing data, you should be good to go.
☐ 2. Log in to Facebook Business Manager with your personal Facebook
account at https://business.facebook.com and go to the client’s Ad
Account.
☐ 3. Click on Menu, then hover over All Tools >, and select Pixels (in the
bar under Assets). Verify Facebook pixel is correctly installed, and
review Event and URL data to validate the installation. If your
numbers are similar (difference of less than 100 views), your pixel is
working correctly!